My RAW Workflow in Lightroom Mobile
As I've outlined different ways to take RAW photos on iPhone, I'll describe my RAW workflow in this tutorial. Since I originally wrote the tutorial, Apple released the iPhone 12 and the Apple ProRAW format, and I included the specifics about ProRAW in this tutorial.
Table of Contents
- RAW editing in Lightroom Mobile is a Premium Feature
- Applying a Profile to your RAW Photo
- Light Adjustments are the first step
- Cropping the Photo
- Color Adjustments
- Effect Adjustments
- Fixing Geometry
- Sharpening and Noise Reduction
- A roundtrip to the light adjustments
- Assigning a name, caption and tags
- Summary
RAW editing in Lightroom Mobile is a Premium Feature
But before we start, here's a little reminder. To edit RAW photos with Lightroom Mobile, you need to have an active Creative Cloud Subscription. If you've been thinking about it for a while, now is maybe a good time!
And if you need some help to decide if a Lightroom subscription is worth it, I've outlined the reasons why I subscribed in this blog post.
Applying a Profile to your RAW Photo
Before we talk about profiles, let me clarify the difference between a profile and a preset in Lightroom mobile. A profile applies a predefined look to your photo without changing the adjustment sliders. At the same time, a preset saves the settings and position of the adjustment sliders so you can reapply the same adjustments to another photo.
I didn't use profiles that much before Apple ProRAW was released, but with ProRAW, you'll need to apply a profile first.
Have a look at the screenshot to the left. It's a ProRAW file without the Lightroom ProRAW Profile applied. As you can see, the highlights are blown out.

Apple ProRAW in Lightroom Mobile without ProRAW profile
If Lightroom Mobile detects a photo in Apple ProRAW format, it will display two profiles in the Profiles section: One for color and one for black and white. If you apply e.g., the color profile, you'll see that the overall photo and especially the highlights improve.

Apple ProRAW Profile in Lightroom Mobile
After applying the Apple ProRAW Profile, you get a good starting point for further developing your photo.
Light Adjustments are the first step
As the first step in my RAW workflow, I adjust the lights using all the sliders you'll find in the lights panel in Lightroom Mobile. And please mind the following words: I'm adjusting the lights, so it looks about right. The key here is the word "about".
I'm stressing this because many of the other steps I'll describe in this workflow will also affect the lights!
So, why lights first? There's no artsy reason for that; I'm doing it to better see the effects from all the other adjustments as the original and unprocessed photo is a bit dark.
So, for this photo, I increased the overall exposure (so I can see something), then I increased the contrast a bit, bring down the highlights and increase the shadows.
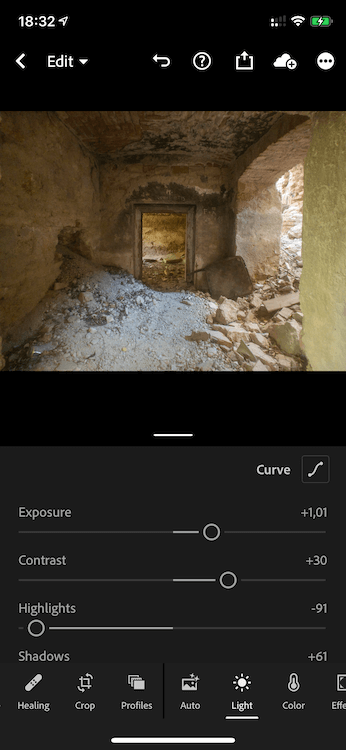
Light Adjustments in Lightroom Mobile
Cropping the Photo
You may want to skip this step, but in my workflow, the second step is always to crop the photo to my preferred format, the square photo format. Somewhere in the blog, you'll find an explanation why I prefer the square photo format.So now, I can see the effects that all the other adjustment sliders will have.
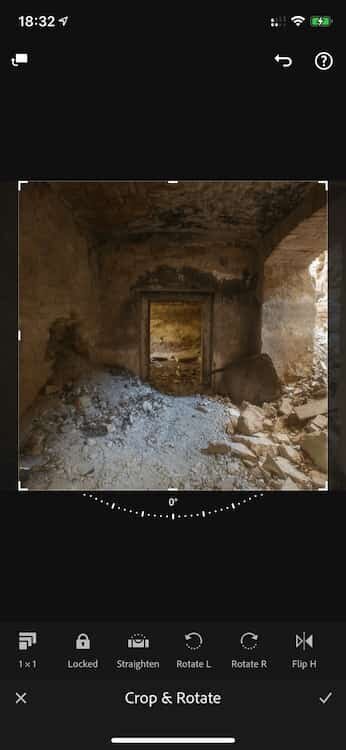
Crop the photo in Lightroom Mobile
Color Adjustments
This is usually the step in my RAW workflow that I spend most of the time: adjusting the colors.
In Lightroom Mobile, you can adjust hue, saturation, and luminance for eight different colors, and I'm outlining this procedure just for one color: yellow.
The entire image has quite a few shades (yes, probably more than 50) of red, yellow, and orange. First, I want to adjust these shades more to the reddish side of yellow.

Adjustier Colors in Lightroom Mobile
Inside the half-buried cellar, you'll see an area with a bright yellow hue looking through the door.
So I'm increasing the yellow luminance to make this area stand out from the surrounding area and to add more depth to the photo.
Please note that there are some other colors in this photo that I adjusted, for example, blue and cyan colors. You'll find these colors in the sand on the left.
I desaturated blue and cyan to separate the sand better from the surrounding area that's mainly orange to get a better foreground.
Effect Adjustments
For photos of lost places, I tend to increase clarity drastically, to add, you guessed it, more drama. For this photo, I added a bit of texture, knowing that we'll lose a bit of texture when applying noise reduction.

Applying Clarity and Texture
I also increased the dehaze slider to remove haze from the bright white light shining into the scene from the right.
Fixing Geometry
As the door frame is not perfectly upright, I'm using the geometry adjustments in Lightroom Mobile to fix that.
For such an image, I tend to use the guided perspective correction feature, where you draw two lines, and Lightroom will make the photo upright based on these two lines.

Fixing geometry in Lightroom
However, all perspective corrections tend to distort the photo a bit. So I'm using the aspect and scale sliders to fix the aspect ratio and to zoom in so that the picture fills the entire frame, and we don't get any white borders from the perspective correction.
Sharpening and Noise Reduction
I've written two blog posts about sharpening in Lightroom Mobile and noise reduction in Lightroom Mobile. Please refer to these posts for more info about sharpening and noise reduction in Lightroom Mobile.
For photos I took at lost places or other images with a lot of texture, I'm careful with noise reduction, so I don't kill all the texture.
I also increased detail and contrast for noise reduction to protect and bring back the fine lines.
A roundtrip to the Light Adjustments
Next, I'm going back to lights adjustments and fine-tune the almost final image using tone curves. For this photo, I want to add more contrast, and thus I move the bottom point of the curve a bit to the right.
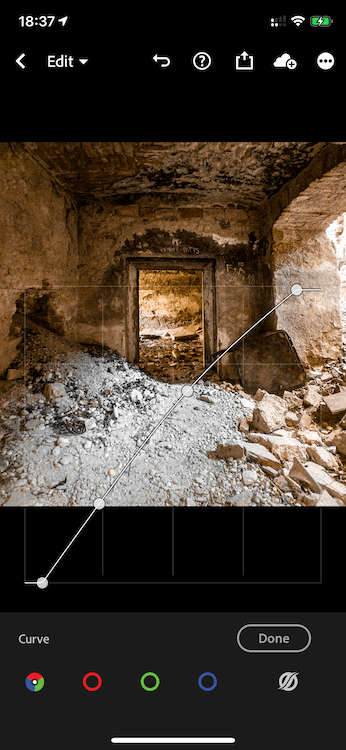
Adjustier Curves as the final touch
Lastly, I may fine-tune the other light adjustments like exposure, contrast, highlights, shadows, white and black points.
Assigning a name, caption and tags
Once I'm done with my RAW workflow, I assign a few keywords to the photo. These are mainly keywords that the intelligent search in Lightroom, Adobe Sensai, does not recognize like "Lost Place" or "RAW".
Moreover, I add keywords that you'll find on my flickr account like "iPhone Photography" or "Shot on iPhone".

Tagging Photo in Lightroom Mobile
If you upload your photos to Flickr using the Flickr app right from Lightroom mobile and you entered a title, caption, and tags for a photo in Lightroom Mobile, Flickr will use them. Just leave these fields empty when the Flickr upload screen appears and just upload the image.
Since iOS 14, the Photos app will also use and display the caption you entered in Lightroom if you export it to the iOS Photos app.
Summary
As I mentioned in the beginning, this is my RAW workflow in Lightroom Mobile, and I'm well aware, it won't fit everyone.
It wasn't my intention to write a blog post about the RAW workflow rather than provide a starting point for you to develop your own.
Care about some quick feedback about this article?

It's helpful

I still have a question

Not what I was looking for