How to sharpen a photo in Lightroom Mobile
Sharpening in Lightroom Mobile seems to be a bit of a mystery. You may wonder why Lightroom has four sliders when you just want to sharpen a photo? Especially when other iPhone photo editing apps seem to get along with only one slider?
Let me answer these questions in this blog post about how to sharpen photos with Lightroom Mobile.
What is sharpening in Lightroom Mobile?
Sharpening in Lightroom is a bit misconceived. It's not a magic slider that will "unblur" (=sharpen) a blurry photo with some software magic.
Instead, sharpening increases the contrast along the edges that Lightroom detects in a photo.
With just one slider, you may run into some difficulties when trying to sharpen a photo; for example, you'd even sharpen noise that you have and make that more visible. Secondly, you may want to sharpen fine edges to emphasize details in texture.
And that's the reason why we have four sliders for sharpening in Lightroom:
- With the sharpening slider, you control the intensity of sharpness.
- By adjusting the radius slider, you define how much sharpness is applied. This affects the resulting thickness of the edges.
- Using the details sliders, you adjust what is sharpened in your photo. Either just the more prominent or even the fine edges.
- And finally, using the masking slider you choose if sharpness is applied to the entire photo or only to areas with strong edges.
Let's have a look at each of these sharpening sliders in detail.
Always use two fingers for sharpening
To help you with sharpening, Lightroom offers a useful feature. Keep one finger tapped on the photo while dragging one of the four sliders with the other finger.
Lightroom will display a schematized version of your photo that will help you to see what will be sharpened and to which extent. I have a screenshot of how this looks like for each of the four sliders in the chapters below.
Sharpening Slider in Lightroom Mobile
With the first sharpening slider, you're controlling the intensity of the sharpening. But beware, the right area of the slider turns red towards the end for a reason. If you move the slider too far to the right, you're oversharpening your photo.
If you keep one finger tapped on the photo while dragging the sharpening slider, Lightroom displays a black and white version of your photo that helps you to see the amount of sharpness applied.

Keep one finger tapped on the image and adjust the slider with the other one
While you're keeping the photo tapped and drag the slider, Lightroom hides all other sliders and displays the intensity at the top of the screen.
Also, zoom in on your main subject before adjusting this or any sharpness slider. That helps a lot.
I usually set this value to something around 30. Then, after adjusting the other three sliders, I may need to go back to this one and adjust it further.
Radius Slider in Adobe Lightroom
By using the radius slider, you define how strong, in terms of pixels, the sharpness is applied to the edges. A high value will result in thicker edges, while a low value will keep them thinner and more subtle.
To find the perfect radius for your photo, keep one finger tapped on the picture while dragging the slider. Lightroom will display a greyish version of your photo, highlighting how thick the edges will be.

Low Radius in Lightroom Mobile
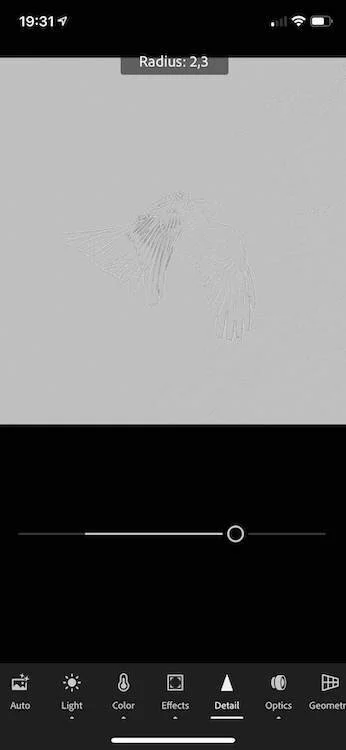
High Radius in Lightroom Mobile
In the above screenshots, you can clearly see the difference between a small and a bigger radius. Using a small radius, only the left wing of the bird will be sharpened while a bigger radius will sharpen our feathered friend entirely.
For this slider and my kind of photography, I use this rule of thumb: If the subject was far away from the lens and you don't see much texture, then I tend to move the radius slider into the right half to bring out the edges.
If the subject was close to the camera or has a lot of texture, I keep this slider in the left half to preserve the natural texture as much as possible.
The Details Slider
As the name suggests, you control how many details are sharpened by adjusting the details slider.
Keeping the slider to the left half, Lightroom will only sharpen the most prominent edges in your photo. Moving the slider to the right half will also sharpen the fine and subtile edges in your photo.
To illustrate that, I've chosen the photo of the parliament in Budapest that I took last year. Have a look.

Low Detail value for sharpening
In the first screenshot, I kept the slider at a meager value. So, Lightroom will only sharpen hardly noticeable and very fine edges.
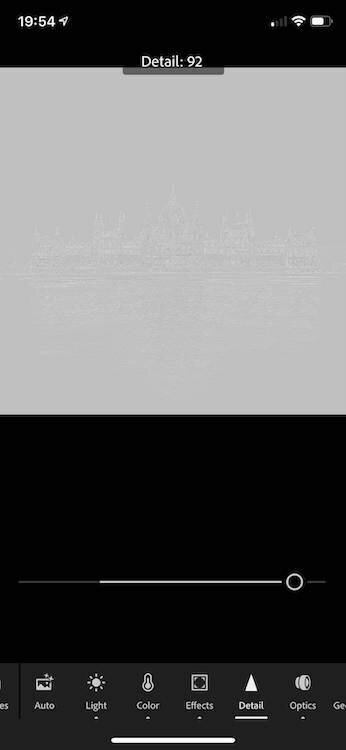
High detail value for sharpening
For the second screenshot, I dragged the slider all the way to the right, and Lightroom selects almost all edges for sharpening.
So, my approach for the detail slider is basically the same as for the radius slider. If the subject was close to the lens and has a lot of texture and detail, I keep the details slider in the left half to apply only subtle sharpening.
If the subject was far away from the lens and doesn't have much texture, like parliament building in Budapest, I move the slider to the far right to bring out even fine details.
Lightroom Sharpening Masking
The masking slider effectively helps you to choose if sharpness will be applied to the entire photo or just to some edges in your picture.
Again, while using sharpening masking, keeping one finger tapped on the photo while you drag the slider will help you to see which edges will be sharpened. Look at these two screenshots:

Low mask value for sharpening in Lightroom

High mask value for sharpening in Lightroom
The first one has a low sharpness mask. So Lightroom will sharpen almost the entire photo.
But in this photo, I want to bring out the bird and avoid sharpening the sky and the clouds. So I drag the masking slider to almost 90. You'll notice the difference.
Lightroom only selects the bird, masking out the sky, and noise within the sky.
For most of my photos, I keep this slider to the far right, somewhere between 75 and 100, to make sure the sharpening is only applied to the main subject of the photo and not to the noise.
Sharpening is the last process
You'll find a lot of adjustment sliders in Lightroom that will affect contrast to some extent. Some of these are the texture slider, the clarity slider, and of course, the contrast slider.
The setting of these sliders will also influence your sharpening. That's why I recommend applying sharpness as the last step in your workflow.
And by the way, you can use sharpening without a Lightroom Mobile Premium subscription.
Happy sharpening!
Care about some quick feedback about this article?

It's helpful

I still have a question

Not what I was looking for