Tutorial: How to use Noise Reduction in Lightroom Mobile
Many photographers don't like noise in their photos; unless you want to create a kind of film noir look, that is.
Whenever you take a photo with the iPhone and save it as JPEG or HEIC, the camera app automatically applies noise reduction to enhance your photo.
But when you shoot RAW on iPhone, the camera leaves developing the photo entirely to you, and that includes noise reduction! And that's the sense of the matter when shooting RAW; that you can develop your picture in your style.
So, in this tutorial, I'll walk you through the noise reduction adjustments in Lightroom Mobile and will provide a few tips along the way. As an example, I've chosen a photo that contains quite a hefty amount of noise to illustrate the process.
But first, we need a bit of theory about the what's and why's of noise in photography.
What is Noise in Photography?
I didn't want to write a physics paper about noise and signal-to-noise ration in photography, so I'll try to explain the reason for noise in your iPhone photos in a few simple words.
In general, noise and the amount of noise in a photo depend on two factors:
- The size of the pixels on the image sensor
- The light sensitivity, commonly referred to as "ISO Speed. "
Let's begin with the pixels. Smartphones tend to have rather small image sensors. To pack a certain amount of megapixels onto such a small sensor, the pixels have to be either smaller and/or closer together.
Smaller pixels mean that they collect less light than larger pixels. This, in turn, may result in slightly different colors that are captured by neighboring pixels on the sensor. This effect is visible as color noise in your photo. Note that there are a few more reasons for color noise, but, again, this shouldn't be a physics paper.
Then, there's ISO speed. To allow the pixels to capture more light in low light conditions, you (or your camera app) may increase ISO speed which makes the pixels more sensitive for light. But, similar to humans, "sensitive "pixels are prone to interference from neighboring pixels. This electrical interference is most often visible as luminance noise, especially in dark or uniformly colored areas.
Once you start shooting RAW, you'll have to learn how to deal with noise in your photos because when shooting RAW, the smartphone camera stores the photo without any behind-the-scenes processing and without automatic noise reduction.
Thus, an unedited RAW photo will contain notably more noise than a JPEG photo taken under the same conditions.
But using a photo editing app like Adobe Lightroom Mobile, you can manually adjust the amount and intensity of noise reduction that's applied to your photos and thus get better results than from the automatic noise reduction.
And this is precisely what we're going to look at.
Two different kinds of noise
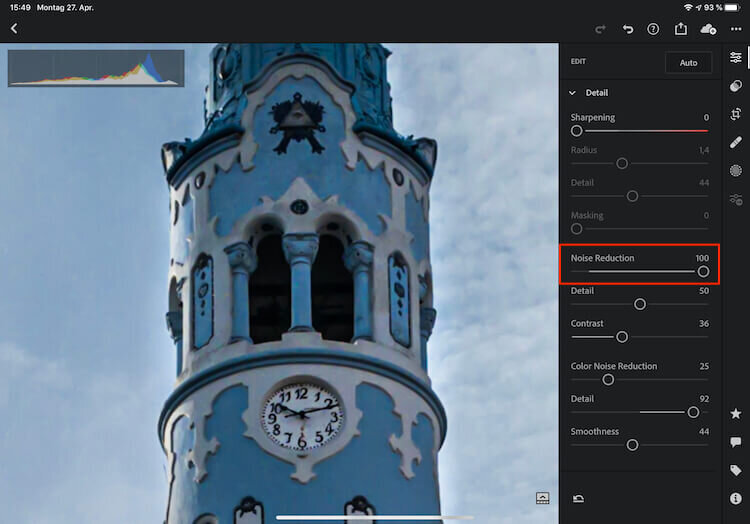
In the sample photo below, you'll see the two different types of noise that can occur in a single photo. On the blue church tour, you'll mainly notice small speckles in different colors. That's color noise.
Second, there's also quite a bit of luminance noise in the photo, that's mainly visible in the surrounding sky and the tower.

Noisy Photo in Lightroom Mobile
As you can see from the screenshot, I've reduced sharpness, color noise reduction, and luminance noise reduction to zero.
Now, let's fix this.
How to reduce Color Noise with Lightroom Mobile
I'll start with the color noise, as this is the most visible noise here. If you have a close look the noise reduction sliders in Lightroom, their default value is actually not zero. There's a small grey area in each of these sliders. The end of this area is the default value for noise reduction, which is 25 for color noise and 10 for luminance noise.

Color Noise Slider in Lightroom Mobile
To fix color noise, double tap on the slider knob, and it will go to the default value of 25. Boom. Color Noise fixed. If there's still color noise visible, then gradually increase the value of the slider but continuously look at your image, so you don't kill the details.

Color Noise fixed Lightroom Mobile
But there are two more sliders for luminance noise. The detail slider will protect fine edges in the photo and is especially useful if you're de-noising a photo with a decent amount of texture. For this sample image, the slider has almost no effect as the church tower does not have that much texture.
If you have a photo with a lot of texture and detail in it, move the slider to the right. Detail will become more visible again but at the expense of the amount of noise reduction in areas with fine lines.
The third slider controls the smoothness and will reduce color mottling artifacts the more you move it to the right.
Most important to know is that these two sliders act in relation to the color noise reduction slider. They will protect fine lines (detail) and reduce mottles (smoothness) but reduce the overall de-noising effect. So it's always a tradeoff between detail and noise reduction.
Usually, you can fix color noise by just using the default value of 25. Moving the color noise reduction slider to anything bigger than 25 rarely has any additional effect, unless you have a lot of color noise in your photo.
If the slider does not have any effect if you move it, then Lightroom could not detect any color noise in your photo. Pretty obvious, isn't it?
How to reduce Luminance Noise with Lightroom Mobile
Now for the more difficult part, which is to reduce the luminance noise. Just look at what happens if you move the luminance de-noise slider to the right. No noise! But also no detail. So moving the luminance slider to the right will kill detail in your photo.
Luminance Noise Slider in Lightroom Mobile
So for this photo, I'll adjust the slider to 35. When working with the luminance noise reduction, always zoom-in (when changing the slider) and then zoom-out to see the results. But don't forget that you're editing on a small screen! While the noise may not be visible on the iPhone or even iPad, you may still see it when printing the photo or viewing it on a large TV. So, maybe set it slightly (like five or so) higher than you would do if you'd only edit the photo for iPad or iPhone.

Luminance Noise Slider in Lightroom set to 35
Next, let's bring back some details. You're right, that's what we use the details slider for. But if you move the slider to the right, you'll recover some details but also bring back some noise. So you have to experiment and see what's a good combination of the denoise and of the details slider. For this photo, I set the details slider to 75.
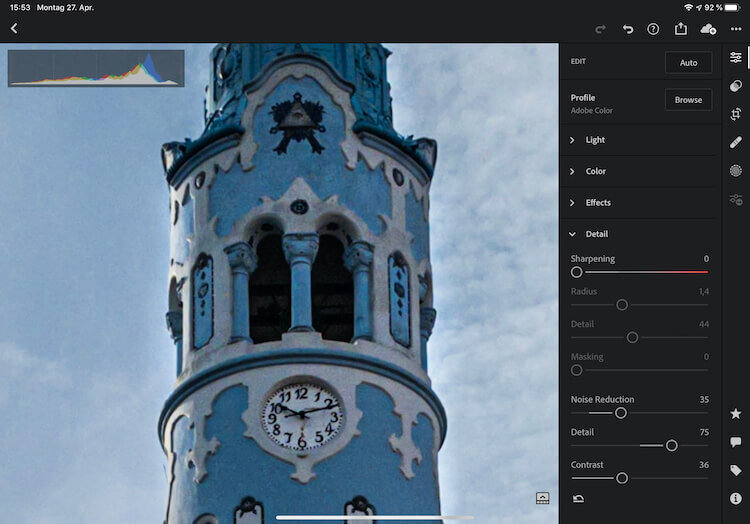
Luminance Detail Slider set to 75
The contrast slider protects contrast at the edges. Again, it comes at the price of noise reduction. The more you move the slider to the right, the more contrast (and noise) you'll bring back.
And so here's the final photo with noise reduction and sharpness applied.

Final Photo with noise reduction applied
Tips for Noise Reduction in Lightroom Mobile
So the key to getting good results with de-noise in Lightroom Mobile are:
- Zoom in and out. Zoom in whenever you adjust one of the de-noise sliders, and once you're done, zoom out again and have a look at the "bigger picture "(pun intended) and check if you're not accidentally washing out any details in your photo.
- When applying luminance de-noise, I usually start with a rather low value of around 25 and then check the entire image if I'm losing too much detail anywhere. If this is the case, I adjust the detail and contrast sliders accordingly. It's a back and forth process that, unfortunately, you have to get used to.
- Be careful with sharpening your photos if they still contain noise. Use a big sharpening mask (move the sharpening mask slider to the right) to avoid sharpening noise and thus make it more visible again.
- And this is just my personal opinion: Don't be too obsessed about noise. In many cases, it's better to get the shot (with some noise) than not getting it.
Next, let's look at a few ways how to avoid noise when taking a photo.
How to avoid noise while taking a photo
Shoot JPEG! No, just kidding. My preferred way is to use the priority mode in ProCamera App.
By using this mode, I can set the ISO speed manually, usually to a value around 100 or even lower, and then let ProCamera App choose the right exposure time.
If ProCamera determines that the exposure time is around 1/10, I'll use the anti-shake shutter release. If the exposure time is even lower, I use a tripod for the iPhone.
So, what I'm trying to say is to keep ISO speed low and compensate for that by using a longer exposure time. When I still used a DSLR, in an era far, far, away, using a long exposure would produce even more noise, because the sensor would heat up. I didn't notice such an effect on the iPhone yet.
Conclusion
Once you've decided to shoot RAW with your iPhone, it will be inevitable to learn how to deal with noise properly. Adobe Lightroom Mobile and its six sliders will help you with that.
De-noising a photo is always a tradeoff between detail and noise. The more de-noising you apply, the more detail you'll lose.
Just take care that you don't kill all the details in your photo and don't fall into despair if it doesn't work out right from the beginning. It takes a bit of practice to get a feeling for these sliders.
And finally, it's always better to get the shot (with some noise) than not to get it.
And now, let's shoot some awesome RAW photos and de-noise them properly.
Care about some quick feedback about this article?

It's helpful

I still have a question

Not what I was looking for