iPhone Workflow Tutorial: The golden church
I walked by this Russian-Orthodox Church probably 100 times in the past years. But only last Saturday, the light was just perfect. During sunset, the church towers were beautifully illuminated by the warm glow of the evening sun. So I had to take a snapshot with my iPhone. Back home, I edited it and published it to my Flickr account.
Again, this photo was selected for Flickr explore, a curated photo feed on Flickr, and so I thought I'll share my process of composing, shooting, and editing this photo on iPhone.
Here's the original, unedited photo:

Church at sunset in Vienna shot on iPhone
If you'd like to plan ahead and see, when the blue and golden hours are, check out my review of the blue hour calculators for iPhone - one of them, Sun Surveyor App, also works great for the golden hour.
Composition
Well, the composition was quite simple. This is the only perspective where you can see the church as a high fence surrounds it.
To remove the wall that you see to the right, I positioned myself in a way that the wall was in front of the tree. This way, I can simply remove the wall by cloning the tree over the fence. I'll cover that in a minute.
Shooting
Also, there was no particular app involved in taking this photo. As I've mentioned above, it's a snapshot.
Usually, when I'm out without taking photos, which happens now and then, my iPhone is attached to the Apple Smart Battery Case.
Did I already mention I like the photo button on this case? Unfortunately, it works only with the built-in iPhone camera app, but it makes accessing the camera app and taking a snapshot so easy.
Just raise your iPhone and look at it to unlock it. Then press the photo button once, and your camera app launches. Press it again to take a photo.
No more swiping. I love it.
Editing
There are three things in this photo that need a bit of additional work. The first one is the wall. I want to get rid of it. Second is the perspective, and third I'd like to emphasize the golden colors from the sunset. So let's have a look at each of these steps
Remove the wall using Touch Retouch
Touch Retouch is one of the iPhone photo editing apps I've been using for years. And even after all these years, the app gets regular updates.
As the name suggests, the app helps you to retouch your photos. We'll use the clone stamp and basically paint the tree over the wall to remove the wall.
So open the photo in Touch Retouch and tap the clone tool in the toolbar at the bottom of the screen.
But before we get started, make sure to set the brush for the clone stamp to use hard edges and no opacity at all by tapping settings and dragging the opacity slider to the right and the hardness to the left.
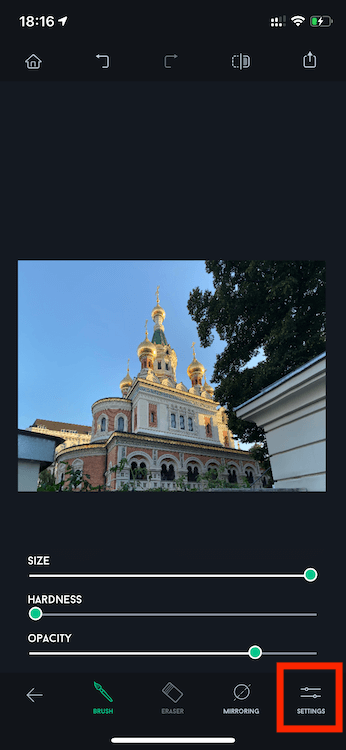
Clone brush settings in Touch Retouch App
If you use soft edges when copying an irregular texture, like the tree, you may get nasty smooth edges where you painted, and that doesn't look good.
Second, using the clone brush can be a bit "dangerous" for two reasons. First is, in this case, I recommend to stay in the natural boundaries of the tree. If you paint out, you'll get a nasty soft edge that screams "retouched" - even if you set the hardness to al the way to the left.
Second, if you just keep painting while using the clone stamp, you're creating a repeating pattern that screams "retouched." So the key to success here is to change the source area a few times while painting the tree over the wall. This will result in a more natural look. To do so, I tapped on different areas in the tree while painting over the wall. Here's the result

Wall remove in Touch Retouch App
Perspective Correction Adobe Lightroom
As the church is not perfectly upright, we'll use the guided perspective correction. In this mode, you'll draw two lines along the building's edges and Lightroom will make it upright.
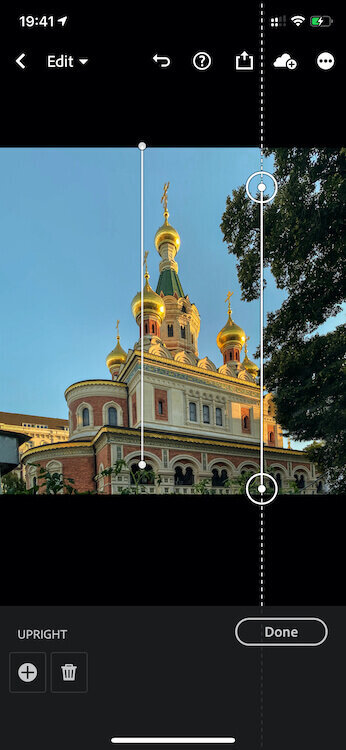
Guided perspective correction in Lightroom Mobile
But it will also distort the building a bit, which we can quickly fix using the aspect and the scale sliders.

Fix aspect ratio in Lightroom Mobile
Final Adjustments in Adobe Lightroom
Next, I'd like to emphasize the golden colors from the sunset. To do so, I turned down the exposure a bit, increased contrast, and reduced the highlights. Then I increased the shadows by +25 and the whites, to brighten up the sky a bit.
Next are the colors, and this is an important part for this photo. First, I increased the reds' saturation and luminance, which will make the red bricks stand out a bit. Next, I decreased the hues for orange a bit towards the reds to further enhance the bricks.
Then, I increased the saturation for the yellows to bring out the golden light more. And finally, I increased the luminance for the sky, the blue tones, a bit.
Now for the temperature. To further enhance the golden touch for the entire image, I increased the temperature slider to about +22. This is the most crucial step, as it will add this goldish tint for the whole image.

Adjust temperature in Lightroom Mobile
As for the effects adjustments, I just applied a bit of texture and finally, I sharpened the entire photo in Lightroom Mobile using a strong sharpening mask at +85 to only sharpen the edges.
And that's it. Here's the final edit that I shared to Instagram, Twitter and Flickr.

Final edit of the church at sunset shot and edited on iPhone
I hope you found this iPhone workflow tutorial helpful, and I'd be happy to hear your thoughts in the comments.
Oh yes, don't forget to check out all the other iPhone Photo Workflow Tutorials I’ve published in the blog or see which recommended iPhone Photo Apps and iPhone Photo Accessories I rely on.
Care about some quick feedback about this article?

It's helpful

I still have a question

Not what I was looking for