iPhone Photography Workflow: The Parliament in Budapest
Let's start this new decade with another iPhone photography workflow tutorial. It's about one of my favorite photos from last year: the Parliament in Budapest, Hungary.

iPhone Workflow Tutorial about how I composed, shot and edited this photo of the Parliament in Budapest
In this tutorial, I'll share how I composed, shot, and edited this photo.
Location Scouting
I went to the Parliament Building in the afternoon to explore the location and to find a right spot for a photo at night.
As the building is right near the Danube, the only possibility to photograph the entire building was from the other side of the riverbank. But it seemed that right across the river was a shipping pier. Several river cruise ships landed right there. I hoped that those would be gone in the evening.
And I was lucky.
When I walked to the spot on the other side of the river at night, I saw one cruise ship after another was putting out.
Compositing of the Parliament Building in Budapest
The main two reasons I took the photo from this angle was the symmetry of the building and the lack of any other structures in the background. To me, that scene demanded that particular framing.
Of course, it was a bit difficult to find a spot that would allow for a perfectly centered building. But using the grid lines in Slow Shutter Cam App helped a bit. To enable then:
- Tap the settings icon in the. Lower right corner
- Locate the grid option in the middle of the settings screen and turn it on.
Apps and Gear I used for this photo
I chose to use Slow Shutter Cam App for this photo because I needed fine granular control of the exposure time. I wanted to flatten the river in the foreground a bit to get a better reflection of the building in the water.
So I set Slow Shutter Cam App to Motion Blur mode with ISO reduced to ISO 200 to avoid noise.
Using my Apple Watch as a remote shutter release, I could see the photo develop right on the iPhone screen and close the shutter once the picture looked good for me.
Of course, With such a long exposure time, using a tripod for iPhone is essential.
How I edited the Photo of the Parliament Building in Budapest
So, here's the photo I got:
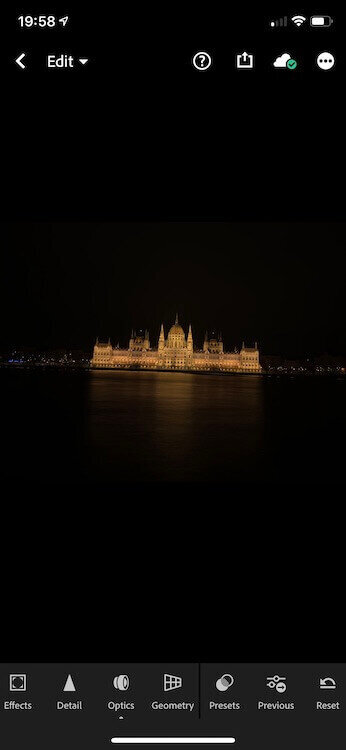
Photo out of Slow Shutter Cam App
There are a few things that need adjustment. First and foremost, the horizon is not perfectly leveled. We're going to fix that in Adobe Lightroom Mobile using the geometry feature, which is an Adobe Lightroom Mobile Premium feature.
For slight correction of the horizon, I prefer to use this feature instead of the straighten feature, because it keeps the resolution intact. I'll show you the details in a minute. First, let's check the resolution of the unedited photo:

Photo Resolution in Lightroom
The photo has the original iPhone camera resolution of 4032x3024 pixels. And we want to retain this resolution.
Next, head over to the geometry feature in the lower toolbar of Lightroom Mobile and tap it. We're looking for the rotate slider in the geometry drawer. Drag it until the horizon is perfectly leveled again and just ignore the white edges that you get for a minute.

Lightroom Mobile Premium Feature: Geometry rotate
Then we'll slightly adjust the vertical lines so that the building looks perfectly upright.

Correct vertical perspective distortion in Lightroom Mobile
Again, we get some white corners and edges. Do as Bobby McFerrin sang: Don't worry, be happy (that you have Lightroom Mobile). Okay, he didn't sing the last line. I just made that up. But we're going to use a cool feature of Lightroom Mobile now, called scale. It's also inside the geometry drawer.

Scale Slider in Lightroom Mobile Premium
By dragging this slider, you'll scale, as the name suggests, the photo. You're essentially resizing it while retaining the full resolution. But won't the image be blurry if you scale it? Nope, if you keep scaling to a minimum, it won't. Try it for yourself and look at the resolution afterward. You can find it under the Info menu in the upper left corner.
Nice, isn't it?
Finally, we increase the exposure about +0.75, bring the highlights down by about -10, increase the shadows by +20 to make the building stand out.
The final two adjustments are the most important ones: Bringing up whites by +30 will make the photo pop! And to ensure we've got a dark night, we reduce the blacks by -25.
As the ultimate and final adjustment, you can make it even more pop by applying a slight s-curve to the curves:

Curve Adjustment in Lightroom Mobile
And here's the final photo:

Final Photo of the Parliament in Budapest. Show on Slow Shutter Cam App. Edited with Lightroom Mobile
I hope you enjoyed this "How I composed, shot, and edited" iPhone photography workflow tutorial. As the geometry feature is paid feature, you may want to check my Adobe Lightroom review and see what else you get when you subscribe, like a free photo portfolio website plus a free license for the Adobe Spark Social Media Tools.
Be sure to check out all the other free iPhone photo tutorials in the blog.
If you'd like to know more about taking long exposures, head over to the long exposure iPhone photography overview, where you'll learn different ways of how to take long exposures on iPhone.
See you soon!
Care about some quick feedback about this article?

It's helpful

I still have a question

Not what I was looking for