Is Photomator by Pixelmator a Lightroom Mobile Alternative?
Though I have my set of iPhone photo editing apps that I've been using for years, I have a few photo editing apps on my radar that I continuously evaluate. Photomator by Pixelmator, originally called Pixelmator Photo, is one of them. In this Photomator review, I'll try to find out if Photomator by Pixelmator is an alternative for Lightroom Mobile.
As a side note before you read this post: Pixelmator announced that it was acquired by Apple. If and how Photomator evolves in the future is not clear yet.
Table of Contents
Pixelmator App vs. Photomator App
The Pixelmator team currently sells two apps for iPhone and iPad:
- Pixelmator App, which is a photo editing software like Adobe Photoshop
- Photomator is an app for developing photos like Adobe Lightroom.
They also sell desktop photo editing software, most notably Pixelmator Pro.
So comparing Pixelmator to Adobe: the original Pixelmator App relates to Photomator just like Adobe Photoshop relates to Adobe Lightroom. Photomator is not an app that replaces the Pixelmator app. It supplements it. In simple words: Pixelmator App is for retouching, and Photomator is for "digitally developing" a photo.
Photomator App is available for iPad, iPhone and MacOS
Photomator is available for iPad, iPhone and MacOS. The iPad edition supports the Apple Pencil.
Photomator Library
One notable difference between Photomator and Lightroom mobile is the photo library. While Lightroom uses its own photo library synced between devices via Creative Cloud, Photomator Photo uses the iOS Photo Library. I've to admit I like that.
To edit a photo, you simply open it from the photo library, apply the desired adjustments and then save it back to the Photos App, where you can choose if you want to modify the original photo or save it as a copy.
Note that if you chose to modify the original, Photomator does not overwrite the original. It uses a feature introduced in iOS a while ago to save the modified copy as a new version.
So you can always revert to the original photo you need or want to.
Additionally, Photomator saves all adjustments in iCloud using its own file format, called "Photomator Edit Document."
Non destructive editing
As the Photomator Edit Document file contains all the adjustments you applied, photo editing in Photomator is non-destructive. You can always reopen an edited photo and selectively remove adjustments.
Supported file formats
Regarding importing photos, Photomator by Pixelmator imports and exports many photo formats. I've successfully tested importing some old RAWs from my Nikon, DNG files shot with ProCamera, JPGs and photos that were taken in iOS HEIF format.
You can export photos in any popular photo format like JPEG, PNG, HEIF, and TIFF to either any cloud storage or save it to the camera roll. Suppose you chose to save it to the camera roll. In that case, you can either save it as a modification (and revert to the original photo anytime) or as a copy.
The Photomator User Interface
The Photomator user interface is pretty straightforward and easy to use. You browse your photo library using the iOS photo picker, then tap an image to enlarge it, and finally tap edit in the upper-right corner to apply adjustments.
Next, choose what you want to do by selecting one of the icons in the upper toolbar, which are (from left to right):

Pixelmator Photo Main Menu
- Apply automatic adjustments based on machine learning
- ML Super-resolution (more on that is further down the article)
- Healing Brush
- Cropping, perspective correction, and straightening
- Adjustments
- Info about the photo and sharing
- As the name suggests, "Done". This will save your edits.
Photomator groups the adjustments a bit different from Lightroom:

Pixelmator Photo adjustments
At the bottom of the screen, you'll see all the built-in and custom presets.
Overview of adjustments in Photomator
Photomator offers an impressive list of adjustments:
- White Balance contains grey, temperature, and tint
- Hue & Saturation contains hue, saturation, and vibrance
- Lightness, which contains exposure, highlight, shadows, brightness, contrast, and black point
- Color Balance allows you to adjust colors for shadows, mid-tones, and highlights
- Selective Color enables you to adjust the hue, saturation, and brightness of 8 individual tones
- Levels
- Curves
- Replace color is an easy way to replace the color (orange) in a photo
- Black and White Conversion
- Color Monochrome Conversion
- Convert your photo to Sepia Tones
- Fade setting
- Channel Mixer
- Invert
- Add a vignette
- Sharpen
- Add and remove grain
Note that it looks like the grain slider can be used to a certain extent for denoising. Just open the adjustment group and move the intensity slider to the left. Use the size slider to define the amount of grain that should be removed.
All of these adjustments are equivalent to their counterparts in Lightroom Mobile.
For editing a photo, Photomator offers the following features:
- Cropping, Straightening, and fixing perspective distortions
- A healing Brush
- ML Super Resolution
I miss one feature in this list that I have in Lightroom mobile: Local adjustments. Unfortunately, there's currently no way to apply adjustments to only a part of the photo. As I often use this feature in Lightroom, Photomator is no suitable Lightroom alternative for me yet, ut it may be for you if you can live without local adjustments).
Let's look at a few other editing features and how they compare to Lightroom mobile.
Selected photo editing features and how they compare to Lightroom Mobile
Cropping, Straightening and Perspective Correction
Behind the cropping icon in the main toolbar are actually three features:
- Cropping
- Straightening
- Perspective Correction

Cropping in Pixelmator Photo
To access these three features, tap the icon in the lower-left corner once you've tapped the crop icon in the upper toolbar.
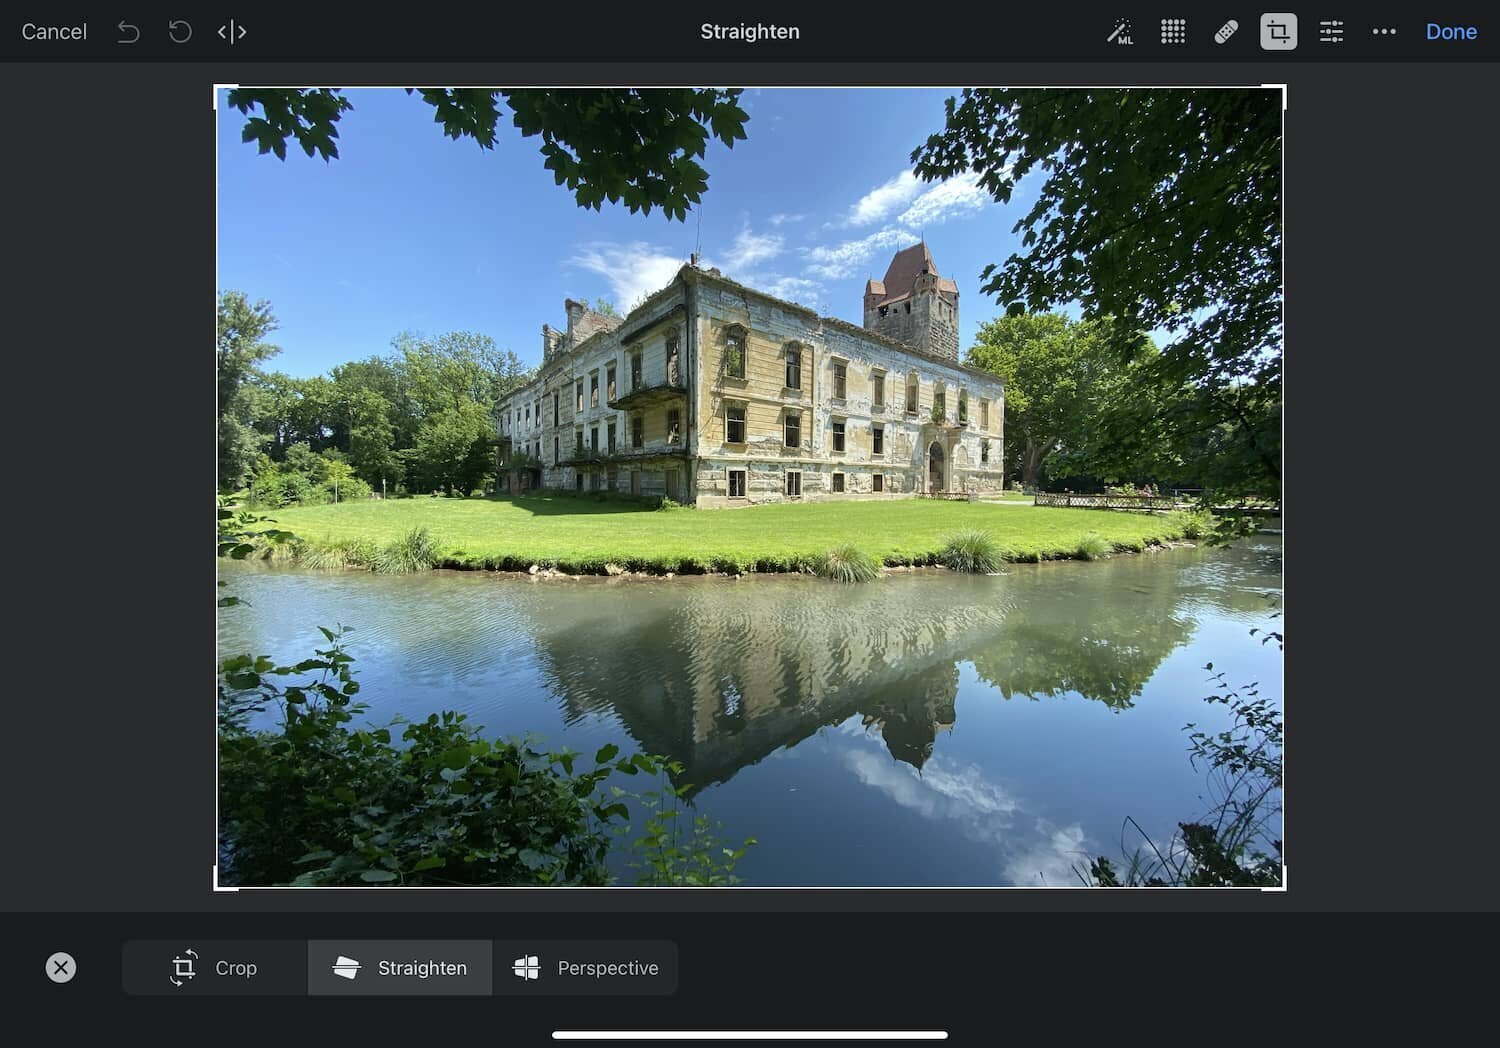
Pixelmator Photo cropping adjustments
Cropping and straightening are pretty straightforward and work similarly to other apps. However, Photomator supports an ML (machine learning) feature for cropping and will suggest a crop for your photo.
Perspective correction is limited. It only works for two-axis: horizontally and vertically. Comparing Photomator vs. Lightroom Mobile, I miss a few additional features, like the guided perspective correction mode in Lightroom or the ability to adjust the aspect of the corrected photo.
If you don't need the aforementioned Lightroom features, you may want to supplement Photomator with SKRWT app, an excellent app for perspective correction on iPhone. Learn more about SKRWT app in my SKRWT app review.
Healing Brush
A healing brush is a tool to remove smaller objects and imperfections from a photo. To use the healing brush, you just paint over the object you'd like to remove, and Photomatoro will do the rest.
While the healing brush in Photomator works well according to a few tests, I miss some Touch Retouch features, such as the clone brush's various follow settings.
Touch Retouch is an app for retouching that I've used for years. To read more about this app, please head over to the Touch Retouch Review
ML Super Resolution
In September 2020, the Pixelmator team released a new version of Photomator that caught my attention. It has a new feature called ML super-resolution. It's an AI-based algorithm that will increase the overall resolution of any photo. I got a resolution of 43 megapixels from a 12-megapixel photo shot on iPhone 11 Pro. That's just astonishing.
I've also tried ML super-resolution with a few DSLR photos from 2005. I lost the original 6 MP RAW files from a trip to Norway due to technical problems and was left with scaled-down JPEGs with 1024x768 pixels.
ML super Resolution increased these photos' resolution to almost 7 megapixels without any loss of detail. I was blown away by the results. Here's a screenshot of one of the photos I'm talking about:

Pixelmator Photo ML Super Resolution before

Pixelmator Photo with ML Super Resolution applied
To use ML super-resolution, tap the icon marked in the previous screenshot.
And here's a before and after screenshot of the resolution of a photo taken with the iPhone 11 Pro.

Pixelmator Photo before ML Super Resolution

Pixelmator Photo with ML Super Resolution applied
You may (or may not) wonder why I don't use a DSLR if I want photos with a larger resolution. Suppose you've read this blog for a while. In that case, you already know the answer: I prefer to travel light, and I'm on an everlasting mission to slim down what I carry and reduce what I own.
Presets
Like Lightroom, Pixelmator Photo supports presets, and you'll find these at the bottom of the screen once you've tapped the adjustment icon in the top toolbar.

Pixelmator Photo Presets (bottom of the screen)
If you swipe over the presets toolbar to the left, you'll notice a little "+" icon. Tap it to save the current adjustments as a preset.
The verdict: Is Photomator a Lightroom mobile alternative?
Initially, I recommended Photomator because it was available as a one-time purchase. But as of August 2022, the Pixelmator team announced that Photomator would also go the subscription route.
If Photomator can be a Lightroom alternative for you depends on your needs. This app works with the built-in photo library and has many excellent features, including features like more granular denoising, but also lacks some features compared to Lightroom Mobile.
If you don't need the extra features of Lightroom Mobile, then Photomator Photo may be a suitable alternative given, that it integrates well with the latest iOS technologies and will soon be available for the Desktop.
You can get Photomator from the App Store.
If you're already a Lightroom Mobile Premium user like myself, you may want to look at Photomator, primarily because of the ML Super Resolution Feature. Because of this feature, I've integrated Photomator Photo into my workflow before importing a photo into Lightroom and using it to enlarge it for e.g., printing.
Let's see how long I can use Photomator without paying for a subscription.


