Review: Auto perspective correction in ProCamera App
ProCamera is one of my few recommended iPhone camera apps that I‘ve been using for years.
Almost each year, ProCamera releases a great new feature. First was HDR, then came Low Light Mode and now we get something new: auto perspective correction. That‘s right. ProCamera will automatically apply perspective correction right when you shoot a photo - and just for the sake of completeness: What ProCamera fixes here is called perspective distortion.
What is perspective distortion?
The kind of perspective distortion we’re talking about here is an effect that you’ll encounter with each camera, no matter if it’s an iPhone or a DSLR. It happens when you try to photograph e.g., a large building and tilt your camera upwards to get the entire building inside the frame.
Here are two sample shots to illustrate that. First is a building I photographed in Bucharest and the second one is from a forest in Bohemia.
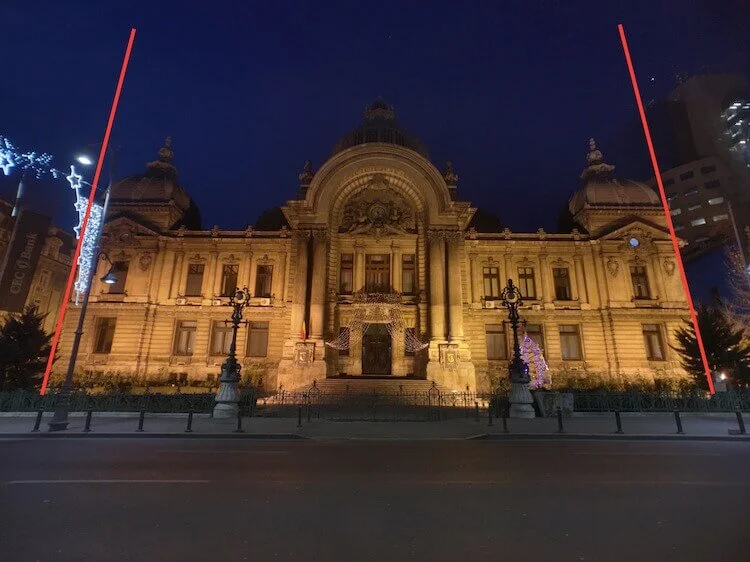
Perspective distortion (red lines) from a building

Perspective distortion (red lines) in a forest.
Unless you photograph with a more or less tilt-shift lens using a DSLR or “zoom out with your feet,” there’s practically no way to avoid perspective distortion. It occurs as soon as you tilt the camera.
Until now, I had to use special apps to fix the perspective distortion in my photos after I took them. To fix vertical perspective distortion, I now can use auto perspective correct in ProCamera App.
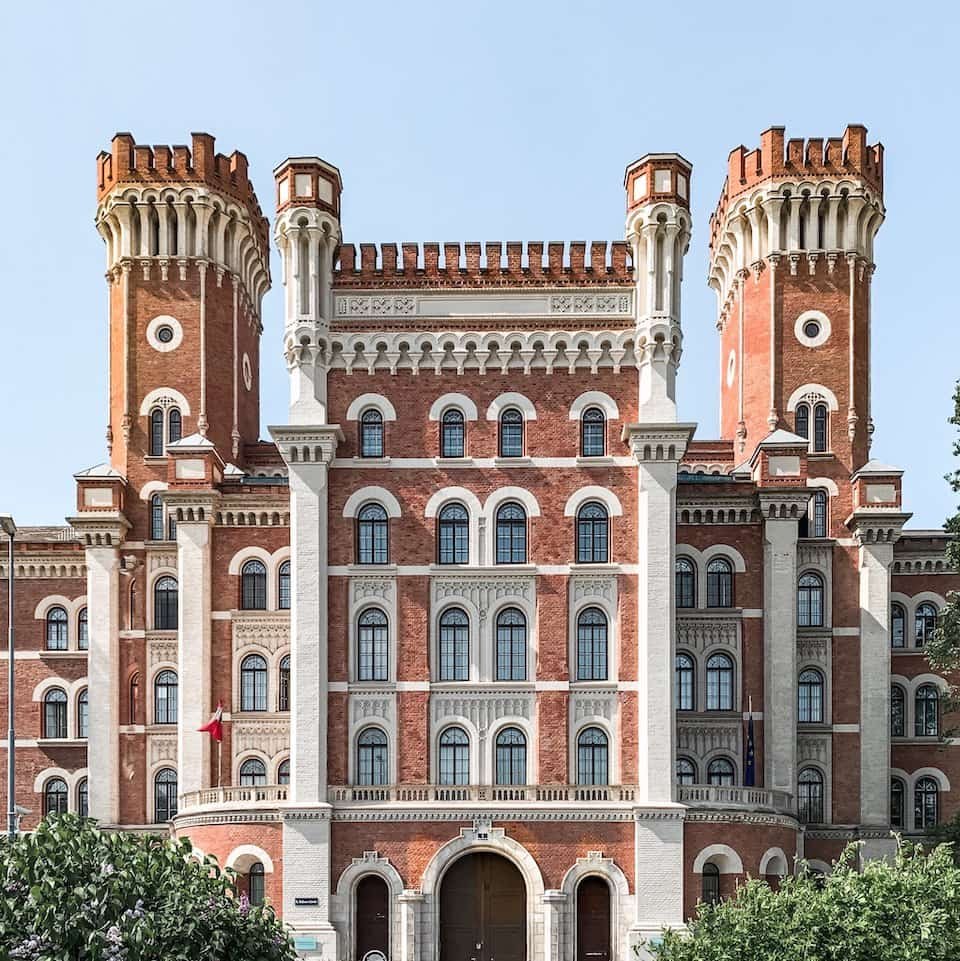
Here are a few sample shots of photos I took so far with auto perspective correction enabled.
Auto perspective correction and iPhone 11 Pro
That was fast. Just a few days after iPhone 11 pro with the new triple lens feature hit the market, the developers updated ProCamera app and now it supports manual switching between all three lenses and even auto perspective correction for the ultra wide lens.
They're always that fast.
Enable and use perspective correction in ProCamera.
Auto perspective correction in ProCamera is available as a really affordable in-app subscription in ProCamera that will also get your LowLight Mode, HDR, private camera roll, and much more. The subscription is called Pro Camera Up and you can test it for free for 14 days.
Currently, perspective correction works only in photo mode. So make sure you‘ve got photo mode enabled by tapping the „photo“ option in the mode selector. Now you should see a little icon in the upper right corner that indicates if perspective correction is turned on or off.
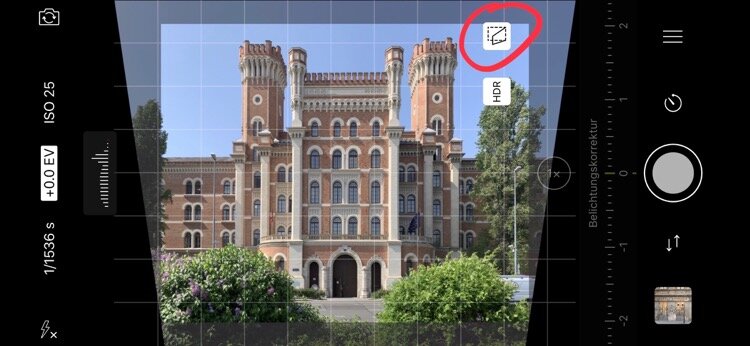
Icon indicating if fixing perspective distortion is turned on or off in ProCamera
One important thing I’d like to mention is that though it may look like that ProCamera is actually cropping your image, you‘ll get the full 12 megapixels from the iPhone camera!
Now, if you photograph a building and tilt your camera upwards, you‘ll see that the viewfinder will display a distorted frame with the perspective corrected version inside. Here‘s what I mean:

Now just press the shutter release, and you‘re taking a perspective corrected photo.
How ProCamera saves the corrected photo
ProCamera used a feature from iOS that allows it to save the original photo and the corrected photo in the camera roll. This way, whenever you edit a picture right in the camera roll, you can always revert back to the original photo.
And ProCamera does the same. So, if you see your corrected photo in the camera roll. Whenever you select a corrected photo and tap edit, you‘ll notice the red „revert to original“ icon is active.

Return to original photo without perspective distortion fixed in iOS camera roll

Tap and hold photo with perspective distortion fixed in edit mode to see original shot
If you tap the „revert to original“ icon, you’ll permanently delete the perspective corrected version and get the original photo. Note that once you reverted to the original photo, there‘s no way to get the corrected version back. But that‘s a limitation of iOS and not a fault of ProCamera.
Things to know when using perspective distortion in ProCamera
As I‘ve mentioned at the beginning, perspective distortion currently only works in photo mode. So no perspective distortion in HDR or Low Light mode. I‘ve already submitted feedback that it would be nice to get perspective distortion in those modes, too.
Second, perspective distortion currently does not work with lenses attached. I guess that‘s some mathematical wizardry that needs to be implemented to work with lenses as lenses basically extend the angle and field of view of the iPhone lenses. I also submitted feedback, that this would be a nice feature
Third, I recommend that you always leave a little space at the bottom and top of the image for the perspective distortion magic. In my tests so far, I learned, that the framing is not always accurate. Sometimes (as with any other perspective distortion apps) you‘ll lose a bit of the frame, either the top or bottom; but that won‘t reduce the overall image resolution. You get the full 12 megapixels from the iPhone camera.
Last, auto perspective mode does not apply when shooting in RAW. As the name “RAW” suggests, you get the raw pixels from the camera sensor. But if you have auto perspective correction enabled and shot in RAW+JPG, then you’ll get a jpg file with a perspective distortion applied.
Conslusion
Fixing perspective distortion in ProCamera is a fantastic feature, and you‘ll bet that I will use it quite often.
However, it won‘t yet replace one of my favorite photo perspective correction apps, SKRWT, because it's the only app that can properly fix barrel distortions from the Moment Fisheye Lens.
If you haven't downloaded ProCamera yet, you can get ProCamera App from the App Store.
Care about some quick feedback about this article?

It's helpful

I still have a question

Not what I was looking for