Adobe Photoshop Express - a powerful iPhone photo editor. A review
Today I want to talk about an app that I use every now and then. It’s a great app for all those quick edits that I don’t edit in Adobe Lightroom Mobile. I’m talking about Adobe Photoshop Express.
This app has been released a while after Adobe retired the first Photoshop Version for iPhone and to be honest, I don‘t know why they called it Photoshop Express; from my viewpoint it‘s more like a Lightroom Express. I guess it was some well thought marketing decision to call the app Photoshop Express.
It seems that the app has evolved from the online photoshop.com service which offered an online (flash based!) version of Photoshop Express. I remember using that a few time probably a decade ago.
Anyway, Photoshop Express allows you to apply a number of different adjustments to your photos. It also comes with a set of predefined „looks“ (aka „presets“ in Lightroom) and you can create and save your own or even „borrow“ a look from a photo that someone posted to the built in Instagram like photo feed.
Adobe Photoshop Express features
As mentioned above, with Photoshop Express you can apply a perceived ton of different settings to your photos, like:
- Crop photos either freely or to one of many cropping presets including special crop presets for social media.
- Rote and flip photos horizontally and vertically
- Fix horizontal and vertical perspective distortions
- Adjust exposure, contrast, highlights, shadows, whites and blacks
- Fine tune temperature, tint, vibrancy and saturation
- Apply clarity and dehaze
- Sharpen and reduce luminance and color noise
- Adjust hue, saturation and luminance for individual colors
- Apply split toning
- Remove red eyes from humans and even pets (did someone say „cat content?“)
- Create a vignette effect & apply photo frames
- Apply a radial or full blur to an image
- Add text or stickers to a photo
- Create collages
- Blend your photos with textures and overlays
- Publish your photos to a sort of Instagram like Adobe Photo Stream (iPhone only). You can then „borrow“ settings from other photos that were published to the stream and apply them to your own photos.
- Share your photos directly to Photoshop, Lightroom, Creative Cloud, Google Photos, Dropbox, Facebook or the camera roll.
That‘s quite an impressive list of features for a free app, isn‘t it? Note that using some of the above functions requires the use of (free) Adobe ID.
I don‘t use all of the above features . The features I use are roughly the first two thirds of the above list.
So, to get you started, here‘s an overview about the user interface of Adobe Photoshop Express
Adobe Photoshop Express User Interface.
The user interface differs depending on if you launch Photoshop Express as an edit extension of the camera roll or as a stand alone app. I use it mainly directly from the camera roll, so let‘s begin with that scenario:
- Select a photo from your camera roll and tap it to view it full screen
- In the upper right corner and select the three dots in the lower toolbar. Swipe right until you see the Photoshop Express logo. If you can‘t see it, you need to enable it first by swiping all to the right until you see the three dots. Tap it and enable Photoshop Express
- Tap the Photoshop Express Logo

Adobe Photoshop Express launched from Camera Roll
In the upper toolbar, you‘ll see 4 icons, which are (from left to right)
- Undo last change
- Redo last change
- Apply automatic improvements and adjustments
- View original (after applying adjustments)
In the middle you should see your photo. Pinch to zoom and swipe to view a certain part of your image.
In the lower toolbar you‘ll see a group of looks that you can apply to your photos just like Instagram filters. Swipe to browse the group and tap to open and see all the looks in this group.
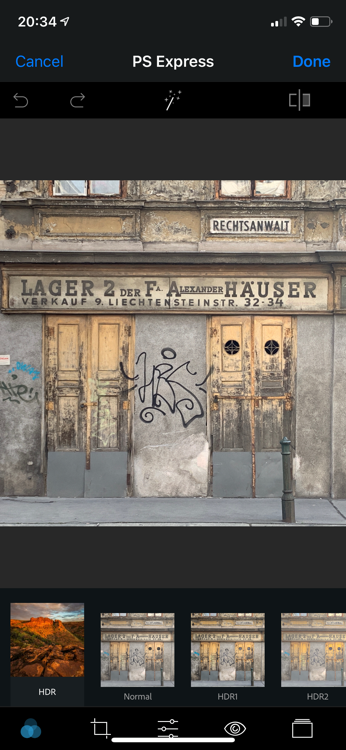
Adobe Photoshop Express looks (here: HDR looks)
At the bottom are the adjustment panels:
- Looks (where we are now)
- Cropping
- Adjustments
- Red-Eye correction
- Vignette & photo frames.
Tap any of the icons to open the adjustment group. Now the different adjustments are displayed right above. Select an adjustment and use the slider to define the intensity of the adjustment. Here‘s an example.

Applying an adjustment in Photoshop Express.
Once you‘re done, tap Done in the upper right corner
When you open Photoshop Express as a standalone app, you get a few more options.

Photoshop Express launched as a standalone app
- Tap on the top center which says All Photos to access photos from the camera roll, Creative Cloud, Lightroom, Facebook, Dropbox or Google Photos.
- Right below, you‘ll see two tabs labeled Edit and Collage
- If you‘re logged into your Adobe ID, you should see a world icon in the lower toolbar. From here you can access the Instagram like public photo stream (from which you can copy adjustments to your photos)
- The bottom toolbar has a few more options. Just swipe it to the left and there you go: Adding Text, Stickers and a few more options become visible.
Conclusion
As I‘ve mentioned at the beginning, to me Adobe Photoshop Express feels more like a kind of Lightroom Express plus some, well, Instagramish features like text in photos, creating a collage or stickers. The other main difference to Lightroom Mobile is in the detail; e.g. you can‘t selectively apply adjustments to just a part of your photos.
But if you don’t need that, Photoshop Express is a great (and free!) app that allows you to apply a lot of adjustments to your photos right on iPhone and iPad. You can get Photoshop Express free from the App Store.
I‘ll keep using it mainly as a quick way to adjust settings right from the camera roll.
Care about some quick feedback about this article?

It's helpful

I still have a question

Not what I was looking for