How to convert a Live Photo to a long exposure (updated for iOS 26)
The easiest way to take a long exposure with iPhone is to take a Live Photo and convert it to a long exposure. In this blog post you'll learn about how to convert a Live Photo to a long exposure, about the limitations of this kind of long exposure photography with iPhone and a suggested workaround.
- Sample Long Exposure Photos converted from Live Photos
- How to take a Live Photo in iOS 26
- Convert a Live Photo to a long exposure photo
- How to overcome the Live Photo Long Exposure limitations
- Summary
Sample Long Exposure Photos converted from Live Photos
Here are three samples of long-exposure photos I took with my iPhone using Live Photos. I took them using different iPhone models since Apple introduced the conversion method with iOS 11 in 2017.
How to take a Live Photo in iOS 26
Taking a Live Photo in iOS 26 is quite similar to previous iPhone models. Just the user interface has changed a bit.
First of all, make sure that in the settings app, under "camera settings" and "formats" the option "photo mode" is set to 24 megapixels.
Next, open the iOS stock camera app and make sure that the format selection in the upper right corner says "HEIC 24". If it doesn't, tap it and then select "HEIC" as the format and "24 MP" as the resolution. Please note that you can't select 48 megapixels. That's reserved for Apple ProRAW.

Format and resolution selector in iOS26
Now tap the mode selector in the upper left corner (in landscape mode).
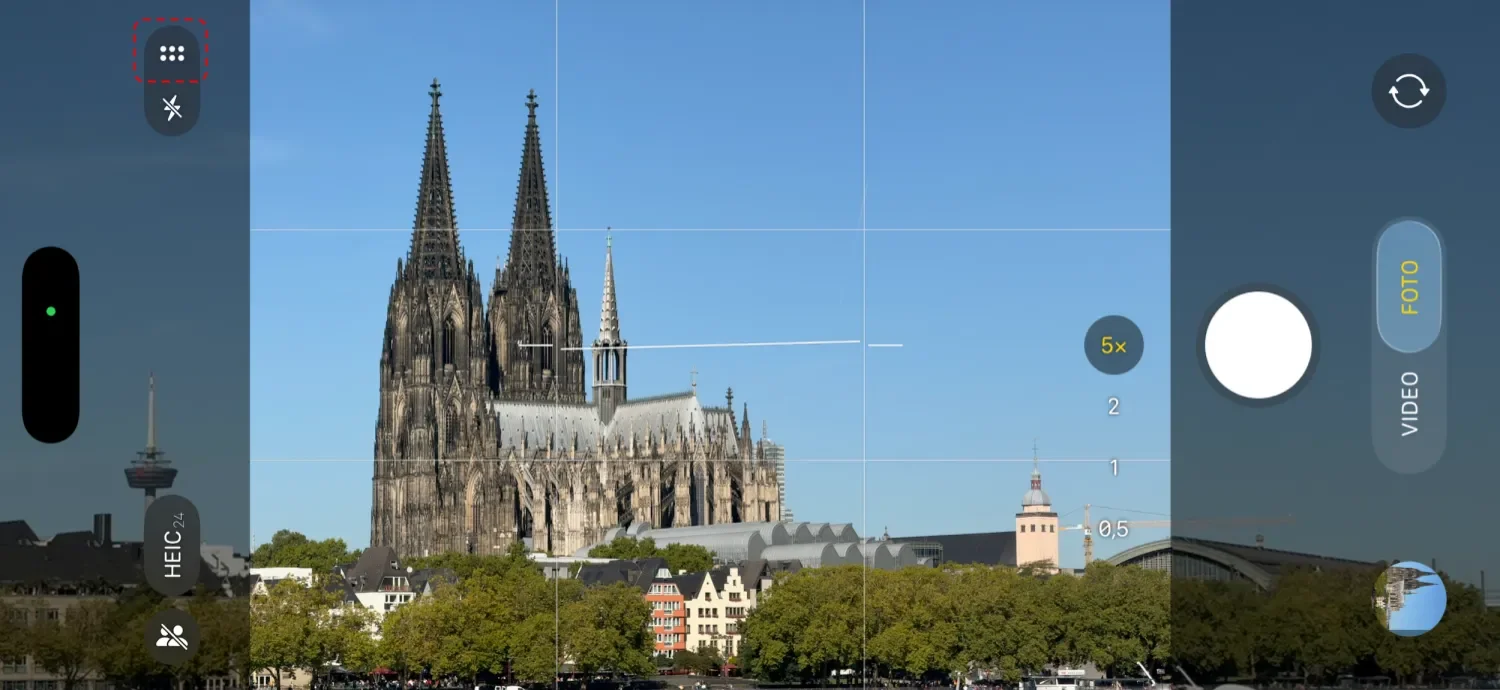
Display camera options in iOS 26
A popup will appear containing several options.
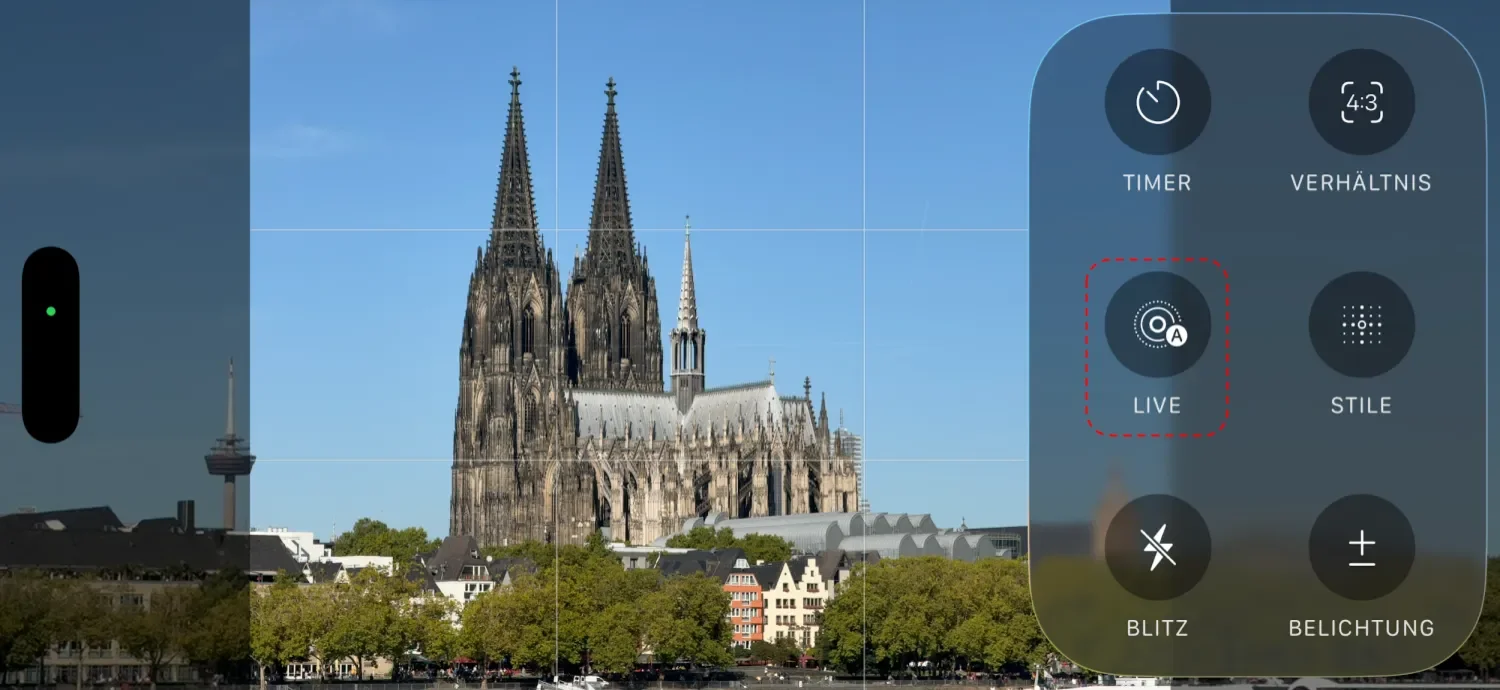
Photo options to enable Live Photos in iOS26
Then tap the middle icon in the left row that says "live" to enable or disable Live Photos.
The "live" setting has three modes:
- Off, meaning you're not taking a live photo
- Auto, which means the camera app will decide if it takes a Live Photo or not. I assume this decision is made by some sort of AI. I haven't used it for far because I like to deceive myself if I want to take a Live Photo.
- Enabled, meaning the camera app will take a Live Photo. This is the mode I usually use.
You can cycle through the three modes by tapping the "live" button repeatedly.
Once you've enabled Live Photos, take your photo and make sure you hold the camera as steady as possible. Live Photo in iOS 26 still seems to use software- based image stabilization. Because even if you set the resolution to 24 megapixels, the converted long exposure will have a lower resolution of around 20 megapixels.
To make sure you get the highest possible resolution for your long exposure photo, you'll have to use a tripod even with Live Photos under iOS 26 and an iPhone 17 Pro Max (the model I have). But even then I occasionally get a lower resolution than the 24 megapixels.
Moreover, long exposure photos converted from a Live Photo are limited to an exposure of three seconds, and you can't change that.
Convert a Live Photo to a long exposure photo
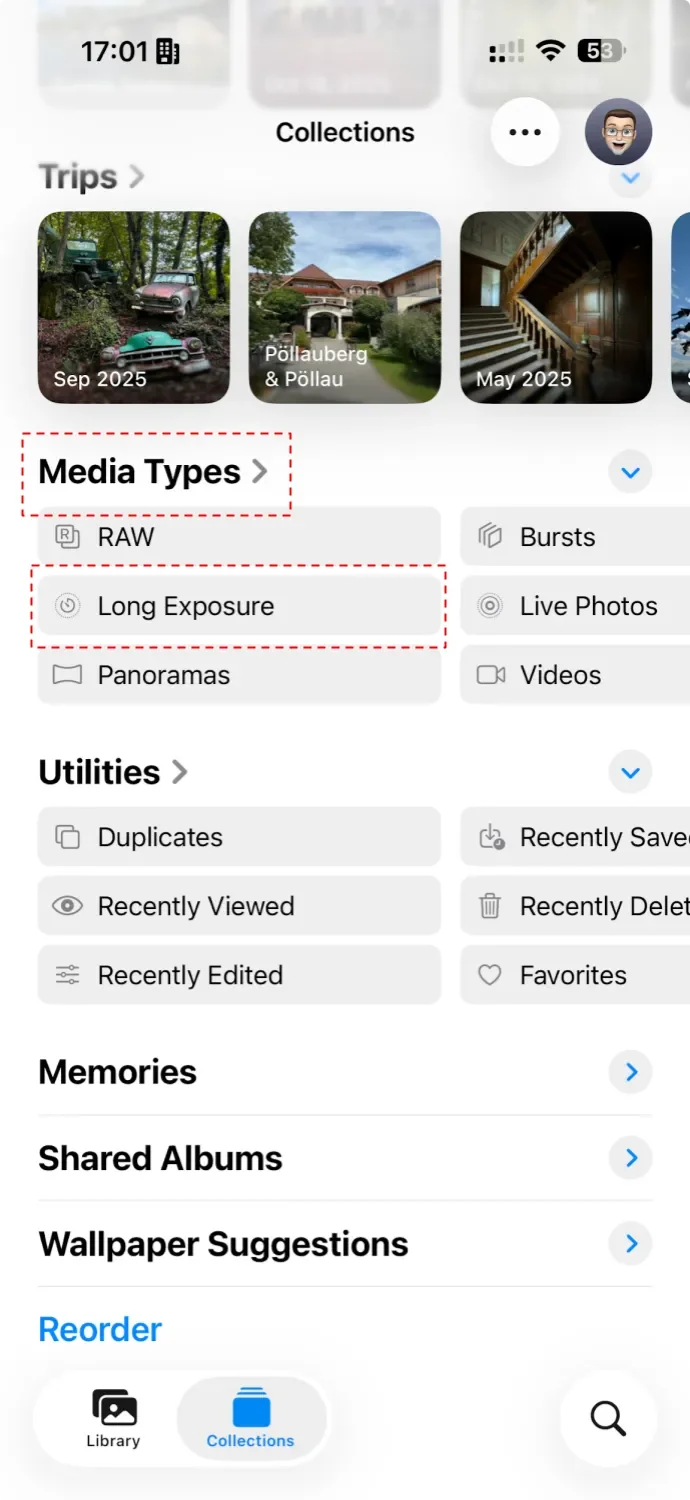
Now open Photos App on iOS 26 and locate the Live Photo. Previous iOS versions displayed a "Live Photo Icon" in the upper left corner of the photo to help you find it. That's not the case in iOS 26 (yet?). But you can tap on "Collections" at the bottom of the screen and then locate the album named "Live Photos" under the "Media Types" section. There you'll find all your Live Photos you can convert to a long exposure.
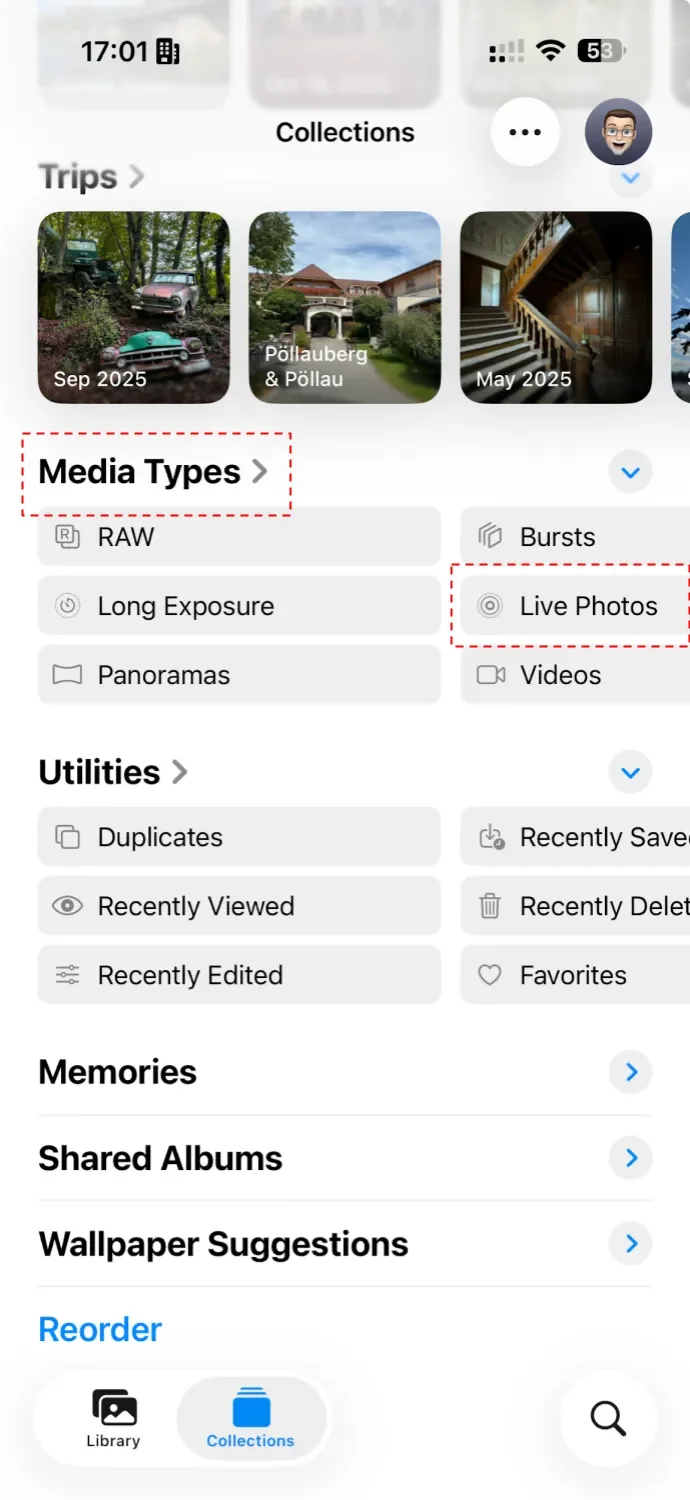
Live Photos Album in iOS26
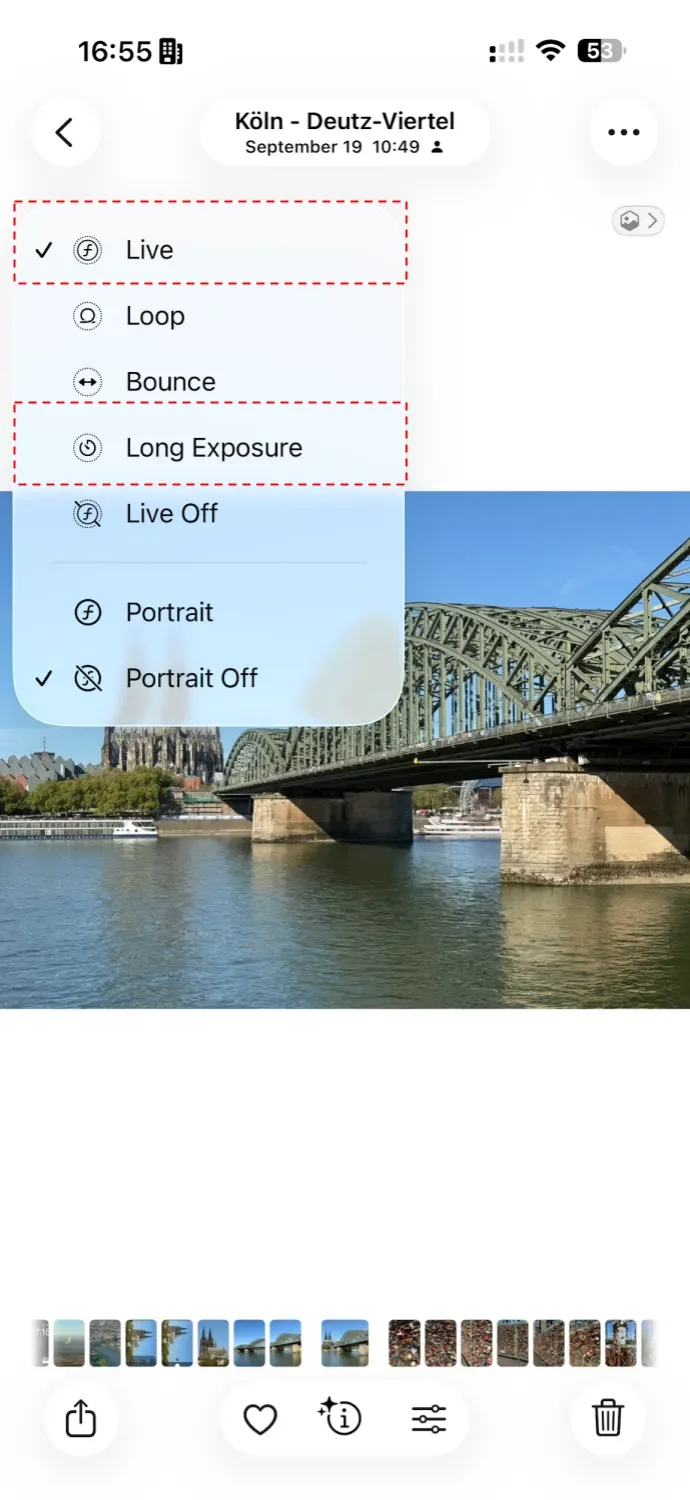
Now tap the photo to open it. Locate the Live Photo mode selector in the upper left corner. Unless you've already changed the mode, it'll say "Live".
Long Exposure Effect for Live Photo
Now tap "Live" and select "Long Exposure" from the menu. Now iOS will convert the Live Photo to a long exposure. There's no need to tap a "save" button or something like that to save the changes. Simply go back to the library by tapping the back button in the upper left corner.
Now you'll also find the long exposure photo in a dedicated album named "long exposure" under "Media Types" in the "Collections" section of the Photos App.
Long Exposure Album in iOS26
Now tap "Live" and select "Long Exposure" from the menu. Now iOS will convert the Live Photo to a long exposure. There's no need to tap a "save" button or something like that to save the changes. Simply go back to the library by tapping the back button in the upper left corner.
Now you'll also find the long exposure photo in a dedicated album named "long exposure" under "Media Types" in the "Collections" section of the Photos App.
Care about some quick feedback about this article?

It's helpful

I still have a question

Not what I was looking for