3 Ways to take long exposure Photos on iPhone
There are several ways to take a long exposure photo on iPhone. In this blog post, I'll show you the three ways of long exposure photography I use myself with my iPhone for my travel photos. I'll also highlight the differences between these three ways and when to use which one.
Table of Contents
- Apps for taking long exposure photos on iPhone
- FAQ about long exposure photography with iPhone
- Seven long exposure photography ideas to try
- Summary
Apps for taking long exposure photos on iPhone
You may wonder why you need a dedicated camera app to capture long exposure photos on iPhone. It's because the hardware shutter speed of the iPhone is limited to 1 second. That is definitely too short for long-exposure photography.
So innovative developers came up with ideas to simulate a slow shutter on iPhone by essentially capturing multiple frames during a long exposure and to combine them into a single frame. One of the first apps that enabled long exposures on iPhone was Slow Shutter Cam App, which I've been using for years.
Before I talk about the apps I use, let's have a look at a few sample long exposure photos I've taken with different apps and different iPhone models
40 second long exposure taken with Slow Shutter Cam App

Flowing water captured with Reeheld Camera App

Long exposure of a train entering a tunnel converted from a Live Photo
Now, let's have a look at the camera apps, and the first is Slow Shutter Cam App
Slow Shutter Cam App is the most versatile camera app for long exposure photography
My favorite camera app for taking long exposure photos with iPhone is Slow Shutter Cam App. I discovered it back in 2012 and I've been using for my long exposure photography on iPhone since then.
Slow Shutter Camera App offers three shooting modes:
- Motion Blur: This mode allows you to create the well known milky effect of flowing water or to blur moving objects like trains or cars.
- Light Trails: A mode for capturing light trails of e.g. passing cars at night
- By using the night photography mode, you can capture well lit and low noise photos at night.
You can learn more about the different shooting modes and about Slow Shutter Camera in my extensive Slow Shutter Cam App review.
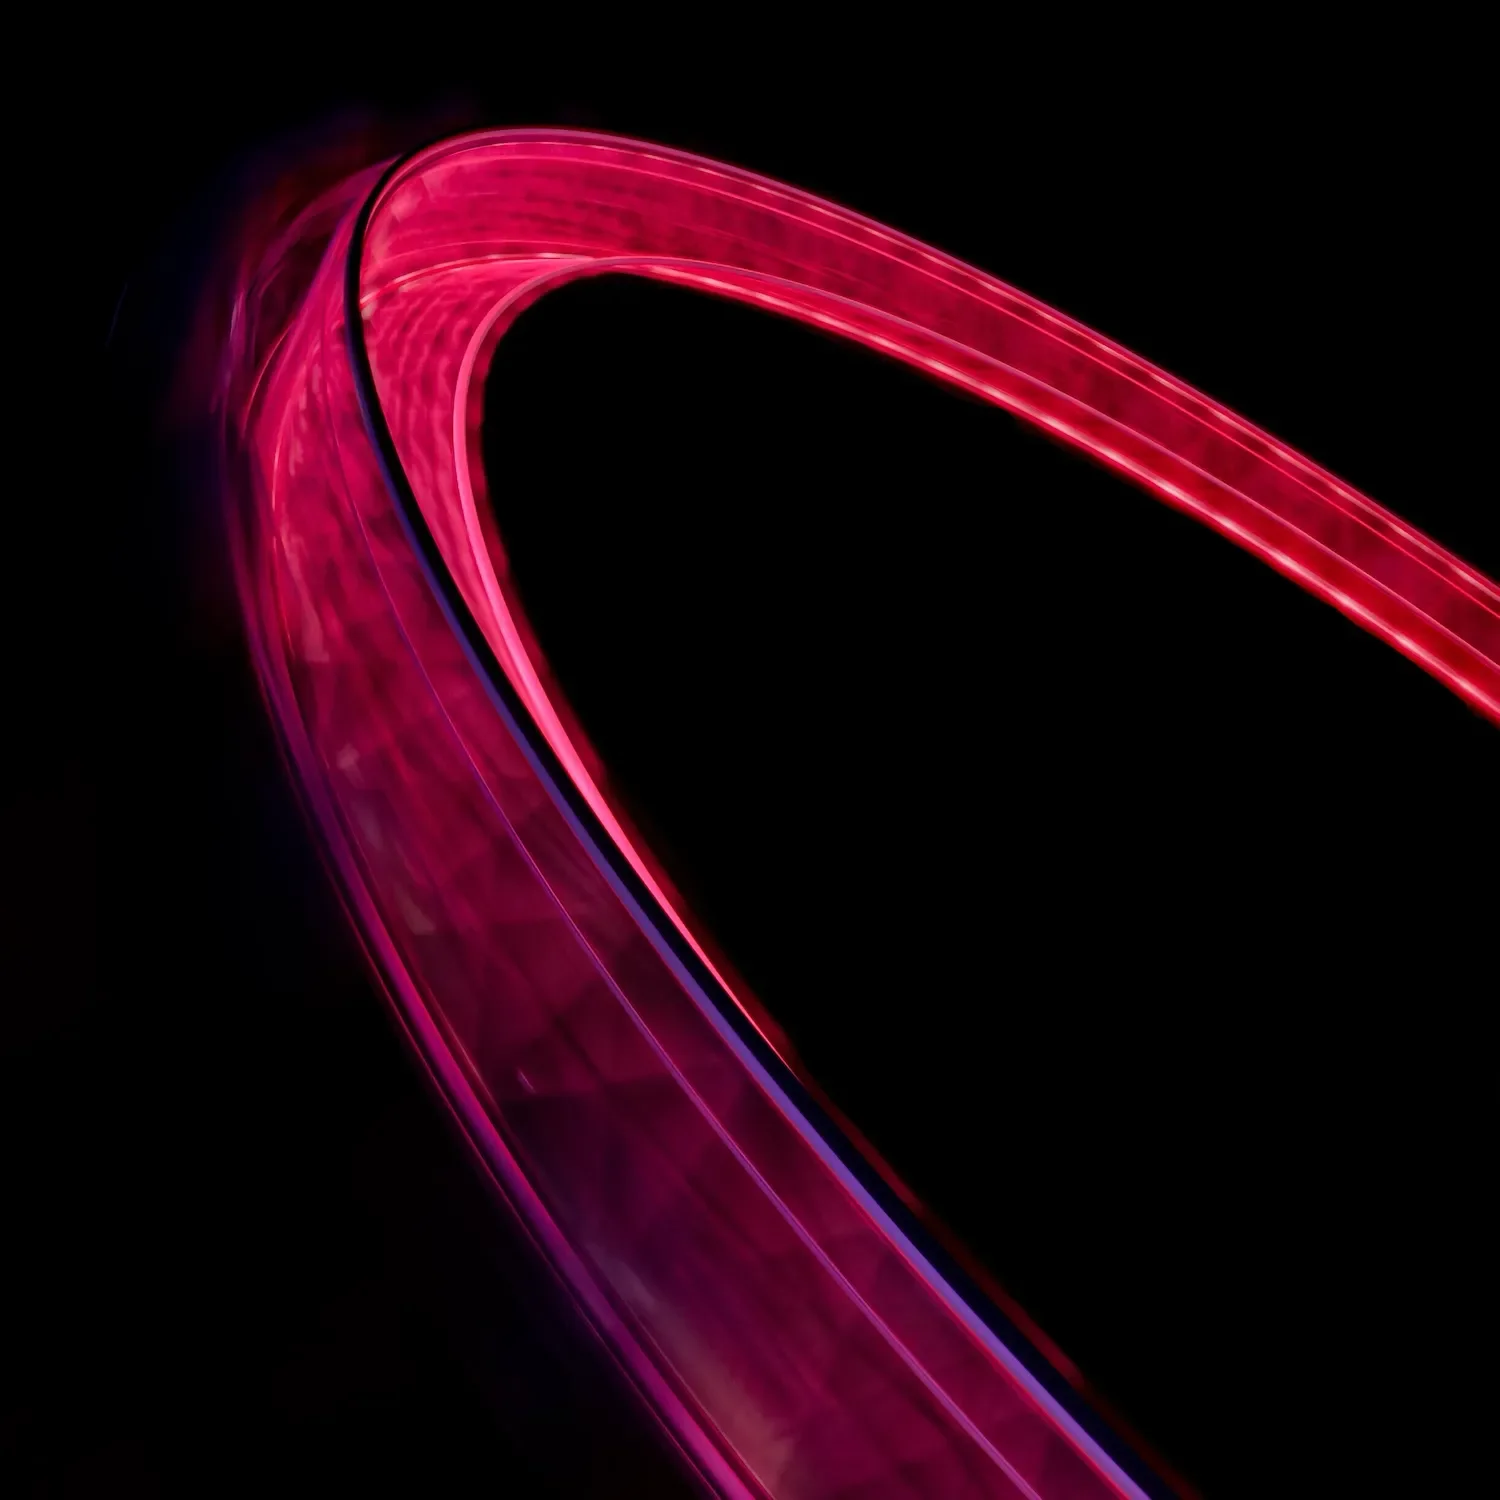
To demonstrate the capabilities of Slow Shutter Camera App, here's a 40-second long exposure photo of the London Eye. I captured this long exposure of the ferris wheel using an iPhone 6S.
40 Second long exposure of the London Eye shot using Slow Shutter Cam App and iPhone 6
But there's even more that you can do with Slow Shutter Cam App. You can adjust the motion blur intensity of your long exposure after you took the photo. Try that with a DSLR! I've also covered this feature in my review.
If you're looking into light painting photography, Slow Shutter Cam App has you covered, too. Set the shooting mode to Light Trail, the shutter speed to bulb, enable focus lock, and tap once to focus on the subject. Now use any light source for light painting.
I use this long exposure technique to take photos in total darkness with iPhone.
If you want to get Slow Shutter Cam App right away, download Slow Shutter Cam App from the App Store. It's available as a one time purchase.
Live Photos is the most convenient way to take long exposure photos
Apple introduced Live Photos with the iPhone 6S. When taking a Live Photo, the iOS camera app will essentially capture a 3 second video clip by recording 1.5 seconds before and after you hit the shutter release button.
Since iOS 11, you can convert such a 3-second Live Photo video clip to a long exposure photo. The results are pretty neat. Here's an example of such a Live Photo I converted to a long exposure using an iPhone 11 Pro.
Live Photo Long Exposure of a streetcar entering a tunnel taken with iPhone 11 Pro
tend to use Live Photos for long exposure photography in good light conditions, and if I don't want to use my tripod because Live Photos use the iPhone's image stabilization. To learn more, check my tutorial about how to convert a live photo to a long exposure.
But there are some disadvantages of using Live Photos for long exposure photography that you should be aware of. Suppose you don't hold the iPhone steady while taking the Live Photo. In that case, Photos App will crop the resulting photo after converting it to a long exposure because of the image stabilization. Thus you'll end up with a lower image resolution, meaning: fewer pixels.
I still see this effect with modern iPhones, though it's not as strong as it used to be with older iPhone models. I believe it depends on which lens you use to take a live photo. If you use the main lens, that has optical image stabilization, I hardly notice the effect. If I use any other lens without optical image stabilization, the effect is more noticeable.
Second, you're limited to a shutter speed of 3 seconds, which you can't change or adjust. Sure, you can crop the 3-second video clip and create a long exposure photo from that shorter clip. But my results with that process were mixed.
So, let's see it this way: Live Photos are a great way to capture long exposure snapshots in good light. Live Photos are a great and easy way to get started with long exposure photography on iPhone-
Reeheld Camera App is the best way to do long exposure photography without a tripod
Reeheld camera app is a pretty new camera app for long exposure photography. What makes it so different from the first two apps I've mentioned is, that you can take a long exposure of up to 30 seconds without a tripod. Compare that to Live Photos and Slow Shutter Camera App: While you can capture long exposure photos without a tripod with live photos, you're limited to 3 seconds. For longer exposures with Slow Shutter Cam App you'll need a tripod.
In other words: Reeheld camera app delivers the best of the two worlds. 30 second long exposures should be sufficient for many cases and you won't need a tripod. A calm hand is enough.
Long exposure of flowing water taken with Reeheld Camera App and iPhone 14 Pro
The app itself is pretty simple, which I like. Just set the shutter speed and press the shutter release. That's it. I've written a pretty extensive review about Reeheld camera app in the blog.
Tabular feature comparison
For a better overview, here's a tabular comparison of the most important features of Slow Shutter Cam App vs. Live Photos vs. Reeheld Camera App.
| App | Max Shutter Speed | Max image resolution | Requires tripod | Supported image formats |
|---|---|---|---|---|
| Slow Shutter Cam App | Indefinite (bulb) | 12 MP (all lenses) | yes | Lossy (JPG, PNG) Lossless (HEIF, TIFF) |
| Live Photos | 3 sec. | 24 MP (wide lens) 12 MP (other lenses) |
no | Lossy (JPG) Lossless (HEIF) |
| Reeheld Camera App | 30 sec. | 12 MP (all lenses) | no | Lossy (JPG) |
Frequently asked questions about long exposure photography with hone
Do I need a tripod?
If you need a tripod depends on the app you plan to use. If you want to use Slow Shutter Cam App then you'll definitely need a tripod. If you want to use Live Photos or Reeheld Camera App then you don't need a tripod, but can use one if you want.
If you want to a small an portable tripod just in case you need one, you may want to have a look at the Joby Gorillapod magnetic I use. You'll find everything you'll need to know about this tripod in my Gorillapod magnetic review.
But when using a tripod, I recommend using a remote shutter release to avoid camera shake when pressing the shutter release. You can either buy one of the affordable Bluetooth Remote Shutters on Amazon or simply use your Apple Watch if you plan to use Slow Shutter Cam App or Live Photos. Both of these camera apps come with a Apple Watch Companion App.
So, if you are looking for a reason to buy an Apple Watch, there you go!
Which camera app do you recommend for taking a 30-second-long exposure with iPhone?
For taking a long exposure of 30 seconds or longer with iPhone, I'd recommend Slow Shutter Cam App. It comes with a bulb mode that allows you to keep the shutter open as long as you need.
Seven long exposure photography ideas to try with your iPhone
And finally, as you've made it to the end of this blog post, here are some ideas to try to get you started with long exposure photography on your iPhone:
- Take a long exposure of a waterfall with iPhone to capture flowing water. Try to find the perfect exposure time. The longer the exposure, the more the waterfall will look like milk. Do experiment a little.
- Find a safe place in your city to capture light trails of cars driving by. Also, experiment with different exposure settings and see the difference.
- Try to photograph fireworks with iPhone and try to capture the entire timeframe from the rocket launch until it explodes.
- Find a well-illuminated building in your city and capture a sharp and noise-free night photo.
- Take a long exposure of a fountain and as a bonus idea: Photograph a well-illuminated fountain at night.
- Go to a fairground and try to take a long exposure of spinning rides with iPhone. Experiment with different exposure times.
- Try to remove people from a busy street or place by taking a long exposure of several minutes during the day or at night.
And now, let's have fun and take some impressive long exposures with iPhone together.
Summary
As of 2023 you have a lot of options to do long exposure photography on iPhone and in this blog post I mentioned the three camera apps I use:
- Slow Shutter Cam App is the most versatile app
- Converting a Live Photo to a long exosure is the most convenient way
- Reeheld camera app is the best way without using a tripod
Surely, there are more apps than the three I've mentioned. But as I only write about the apps I use, I can't tell you if and how good the other apps work.
Care about some quick feedback about this article?

It's helpful

I still have a question

Not what I was looking for