How to manage 25000+ photos with iPhone
I got a Facebook message recently from a reader named Roland K. from Germany. He was curious about how I manage and organize my photos on iPhone.
I thought that this could be interesting for a few more readers, so enjoy this post about how I manage and organize my photos on iPhone and iPad using iOS Photos app and Adobe Lightroom - from shooting to sharing.
How many photos are we talking about?
First, Let‘s talk about the amount of photos I manage with those two apps. I photograph digitally since 2000 and since then, I‘ve accumulated about 25500 photos that I manage with iOS Photos app and Adobe Lightroom Mobile.

25.000+ photos in the camera roll
Let‘s bring this number in a context. 25500 photos over 20 years are roughly 1200 photos per year or 3 photos per day. That‘s not really that much, is it?
Two notes before we begin: First, I spent a considerable amount of time to add tags and geo location to all my older DSLR and point and shoot camera photos. Second, I always photograph with the camera GPS enabled so the photos have a geotag.
So, Let‘s start with the first step in my iPhone photo management process. It may sound counter-intuitive, but I delete a lot of photos.
Shoot more, keep less
One of my personal photography principles is to shoot more, but to keep less. So, within 24 hours, I usually begin to go through all the photos I took using iOS Photos app and to delete those I don‘t want to keep like some photos I took from different angles, with different settings or different apps.
No matter if I‘m traveling, hiking or just take photos at a barbecue with grandma: Usually, within 24 hours, I cull through the photos and delete 80% or (mostly) more of them.
Thanks to the iPhone, I don‘t have to download the photos from the camera to a notebook any more and can go through the photos right on iPhone. That‘s a huge time saver.
Again, here are a few numbers, so you get the idea of how many photos I keep:
- 10 days in New York: Took 2000 photos, kept 150.
- 1 day at a lost place: Took 250 photos, kept 15.
- Shooting a single spot in Vienna: Took 30 photos, kept 2.
Next I select those photos I edit and publish.
Keep a few photos, publish even fewer
The next step is to select the photos that I want to edit and publish. I use publish in a very broad sense here. It means sharing them on the blog and Social Media as well as have them printed either on canvas or as a photo book.
For this step, I created an album in Photos app named selected. It‘s where I add all the photos I want to edit. At most, 50%-75% of the remaining photos from the previous step find their way into this folder. The rest are usually personal memories I don‘t publish and that I adjust only with Photos app.

Selected album used to collect photos for editing
Next, I import those photos from the selected folder into Adobe Lightroom Mobile.
Managing and editing Photos in Adobe Lightroom
In Adobe Lightroom Mobile, I edit the photos from the selected album. Once I‘m done with editing, I assign a few keywords to them, copy some of them to an album in Lightroom Mobile, and assign either an accepted to rejected flag to them.
Assigning Keywords in Lightroom Mobile
Each photo in Lightroom Mobile gets between one and three keywords after I’m done with editing. The keywords I use here are usually keywords, that Adobe Sensei, the AI image recognition from Creative Cloud that‘s used in Lightroom, does not recognize and therefore can’t assign automatically like the keyword Lost Place or the name of the camera app.

Keywords assigned to a photo in Lightroom Mobile
Folders and Albums in Ligthroom Mobile
Then, I may copy an edited photo to one or more albums in Ligthroom. I currently have a number of albums in four folders. These are:
- Portfolio
- Sample Photos
- Customers
- Style
Portfolio is for the photos I publish to hte Adobe My Portfolio Site, that‘s included with a Ligthroom Mobile Premium subscription.
I‘m continuously building, publishing and updating topic based portfolio sets, each of which contains a maximum of 42 photos. If you‘re wondering why exactly 42 photos, you‘ll find the answer in the book The Hitchhikers Guide to the Galaxy.
In Sample Photos, I have a number of topic related albums like Night Photography, RAW, or Slow Shutter Cam. Those are the albums where I keep All the sample photos that you can see throughout the blog. It‘s usually limited to 6 photos per album. 6 works great on responsive websites. You get two rows of 3 photos each on desktop, 2 rows of 3 photos each on a tablet and 6 rows on a smartphone. Whenever I add a new photo, I remove an older one.
Style is a folder where I experiment with certain presets for my photos that I create.
And finally there’s the customers folder. I think that’s pretty self-explanatory. From here I share password protected albums directly from Lightroom Mobile for customers and clients to view, browse select and download edited photos.
Accepted and Rejected flags
Adobe Lightroom Mobile allows you to assign star ratings as well as an accepted and rejected flag to your photos.
I use the accepted and rejected flags in the following way:
- Each photo is marked as accepted once I published it (on the blog, Flickr, Instagram, Facebook)
- A photo gets the rejected mark if I‘m editing a new copy of it.
I don‘t use star ratings at all for one reason: Either, I like a photo, then I keep it. If I don‘t like a photo, I‘ll delete it. For me, assigning e.g. a three star rating (like „I like this photo a bit“) to a photo does not make sense for me. Your mileage may vary.
To assign an accepted or rejected flag in Adobe Lightroom Mobile:
- Tap any photo from your library to view it full size
- In the selector in the upper right corner, tap Rate and Review
- At the bottom, either tap the flag containing a checkmate (accepted) or the flag containing a cross (rejected).
- To completely remove any flag, just tap the selected flag again.

Assigning flags in Lightroom Mobile
Filtering Photos in Lightroom Mobile
A great feature in Ligthroom Mobile is the filter you can apply to albums. You can find it in the upper toolbar in the library view.

Applying a filter to an album in Lightroom Mobile
Here, I can select to filter the photo library for a number of things. I use this feature in addition to search to find photos inside the library. Using the filter feature, you can filter for:
- Star Rating
- Accepted, rejected or unflagged
- Media
- Camera (great for finding photos that you took with a specific camera (iPhone model in my case). Does not contain the name of the camera app!)
- People
- Location
- Keywords
- Edited (Great for discovering orphaned files that you imported but, for some reason, forgot to edit.
Exporting edited photos from Lightroom to the Photos app
Finally, I export the edited photos at full resolution back to the Photos app. Once I‘m done editing all photos from a trip or a photo session, I select favorites in Photos app. Those favorites are usually the ones that go into a photo book, printed as canvas prints or get shared on the Internet.
One reason I use the Photos app as the main photo storage is that backing photos from there is easy and convenient.
Finding and re-discovering photos in the Photos app
iOS Photos app helps you to find and re-discover photos in a number of ways.
First, it has an excellent search that you can either use by typing in a search term or with Siri:
- Ask Siri to „show my favorite photos from ...“ where from can be a location or even a year.
- Enter a location, year, or even the name of a person (if you use the people feature) to discover photos.
- Use search terms of things displayed in a photo. Using machine learning, the search functions can detect a number of things like buildings, seaside, mountains, trees and so on. It can even distinguish between cats and dogs!

Places album to re-discover photos

Searching for locations in photos app
Backing up photos from iOS Photos App
I‘m a little paranoid when it comes to backups. Since I lost a few 100 photos in 2005 due to a simultaneous (!) hard disk defect on my Mac and a single drive NAS, I chose to back up my photos in several ways since 2005.
Additionally, backing up photos from Photos app works automatically in the background and saves the original as well as the edited photo that I exported from Lightroom Mobile.
Backup Photos from iPhone to Synology
In case you‘ve never heard about Synology: That‘s a brand that sells network attached storage devices („NAS“).
The Synology model I own is already a little aged but works well for my needs. It has four harddisks that are configured as a RAID system. In simple words this means, that, if a single harddisk fails, you can simply swap it and all your data gets restored. No data loss.
The capability of restoring data comes at the price of usable storage: If you have e.g. 4x2 TB disks in the NAS, you can use 6 TB for storage. The remaining 2TB are used to save recovery information in case of a harddrive failure.
What I really like about the Synology NAS is, that those come with their own operating system and a lot of apps and services that you can use.
One of those is a photo management service called „Moments“. With the corresponding app from, you can upload photos to the Synology manually and automatically from Photos app in the background (if you‘re connected to your home WiFi).
Backing up Photos from the Synology NAS
Additionally, I back up the photos from the Synology to a separate USB drive weekly - just in case. I do this using the automated backup app from the Synology NAS. Once configured, it automatically copies the Moments folder, where all the photos are stored, to the USB drive.
Backing Up Photos to Amazon Prime Photos
Lastly, I use Amazon Prime Photos. That‘s a free service you get with an Amazon Prime subscription. It offers unlimited space for your photos and can be configured to upload your photos in the background. If you don‘t have it, you can try Amazon Prime free for 30 days.
There‘s one issue with Amazon Prime Photos. Whenever you change your iPhone, you have to re-enable and re-start the automatic backup process again. It won‘t upload duplicates, but Amazon Prime Photos checks all photos (and videos) if they‘re already uploaded. That can take a while (but runs in the background).
To enable automatic backup to Amazon Prime Photos, you need to have a paid Amazon Prime account. Then:
- Download the Amazon Prime Photos app
- Tap the hamburger menu in the lower right corner
- Choose settings
- Choose uploads
- Enable auto save
- Choose if you want to upload photos also using mobile data.
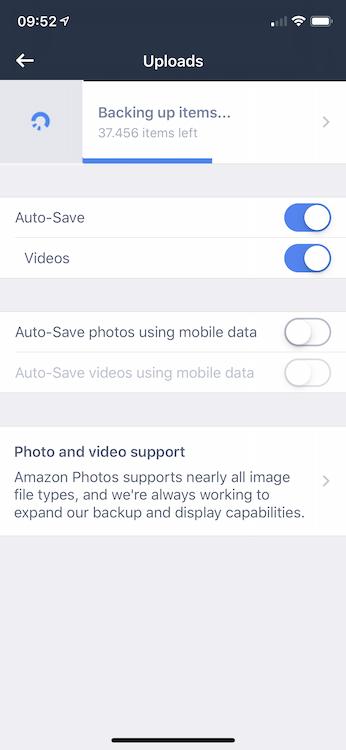
Automatically backup photos from iPhone to Amazon Prime
Summary
My way of managing photos on iPhone and iPad may not be the most sophisticated method you‘ll find but it works great for my kind of travel photography:
- I use Photos app to for the originals and final edits and I backup everything from there.
- I use Lightroom as a repository for edited photos and portfolios and for sharing photos with clients.
To find and re-discover photos in both, Photos app and Ligthroom, I mostly use:
- Geolocation from either search or the places view in Photos app
- Manually created folders
- Flags and a few keywords in Lightroom
Care about some quick feedback about this article?

It's helpful

I still have a question

Not what I was looking for