How to simulate High-Key Lighting in Lightroom Mobile
High-Key Lighting is a popular style of photography that involves creating bright, light-filled images with bright colors, few shadows, and soft light by reducing the light ratio in a photo. You can find photos with high-key lighting in all photography genres - from bright portraits to clean product shots to futuristic-looking architecture.
In this blog post, I'll focus on architecture, and you'll learn how to edit a photo to simulate High-Key Lighting on iPhone using Lightroom Mobile.
Table of Contents
- Take a photo for High-Key editing
- Sample Photos
- High-Key Editing in Lightroom Mobile
- Final high-key photo
Sample edits simulating High-Key Lighting
Before we get started, here are three more High-Key sample photos edited in the same way as described in this tutorial.
High-Key edit of an abandoned ballroom.
A face with a High-Key edit applied.
A High-Key edit take in a library in Vienna.
How to take a photo for High-Key editing
If you'd plan a High-Key lighted portrait photo, you'd need a particular setupstarting with a bright background and a dedicated light design.
But as this blog post is about High-Key architecture photography and editing, I have good news: You don't need any special equipment or a camera app. Please take a photo and make sure it's well exposed without any dark and too bright (burnt) areas.
How to turn a photo into a High-Key lighted photo using Lightroom Mobile
Though I'll show you how to do a High-Key image edit in Adobe Lightroom Mobile, you can follow the procedure with almost any other editing software that offers similar editing features.
Here's the unedited photo of the famous library in Stuttgart.

The unedited photo of the library in Stuttgart
As you can see, the photo is a bit dark, and the white interior of the library is more blueish than white. But we'll fix that in a minute - and no, we don't just turn up the exposure.
Step 1: Increase whites
As the first step, please go to the light editing group and increase the whites. As you can see, I've increased the whites quite a bit to +85. Please experiment with the correct value for your photo. Ensure you don't burn (eliminate) all the details by increasing the white value too much.

Increasing Whites is the first step for a High-Key edit in Lightroom
Increasing the whites brings us one step closer to our final High-Key image. But we still have a few harsh shadows that we want to brighten.
Step 2: Increase blacks
By increasing the blacks, we make the harsh shadows a bit softer. Again, I've turned up the black quite a bit to +54. Please experiment to find the perfect value for your photo.

Increase the Blacks
Step 3: Lift shadows
We're still in the light editing group. As the next step to turn this image into a High-Key photo, we lift the shadows by moving the shadows slider to the right. Again, I cranked it up to brighten the shadows and make them even softer.

Lifting the shadows is a great way to improve a high key edit
Step 4: The Secret Sauce: Add haze & reduce clarity
Now switch to the effects editing group. Here we'll add the secret sauce for awesome High-Key images: The dehaze slider. Usually, you'd use the dehaze slider to remove fog and haze. But for a High-Key photo, we'll do precisely the opposite: We add haze to make the shot even brighter and add a touch of soft light.

Adding haze is the secret sauce for a high-key photo edit
Move the dehaze slider to the left to create a dreamy High-Key image. I wanted to add a slight haze and soft light, so a value of -24 is perfectly alright for this photo.
Another adjustment worth trying for a High-Key edit is the clarity adjustment. Move it slightly to the right to reduce clarity and add more softness to the entire scene.
If the whites look too creamy after this step, try moving the color temperature slightly into the blues.
Step 5: Desaturate other colors
As you can see from the previous steps, the library is illuminated with an orangish light. Let's get rid of that orange tone and turn it into white. Please switch to the color adjustment group and tap color mix.
To eliminate the orange light, desaturate the orange tones by tapping orange and moving the saturation slider to the left.

Desaturate more colors for a high key look
If you want to desaturate areas containing a specific color, use a mask to select the area and reduce the saturation
Step 6: Use Masks to fix specific areas
As the last step, use masks to fix specific areas of your photo. For example, the roof in the picture is still a bit too dark. I want t to brighten it. So I pulled a linear gradient mask from the top and increased the exposure for the masked area.
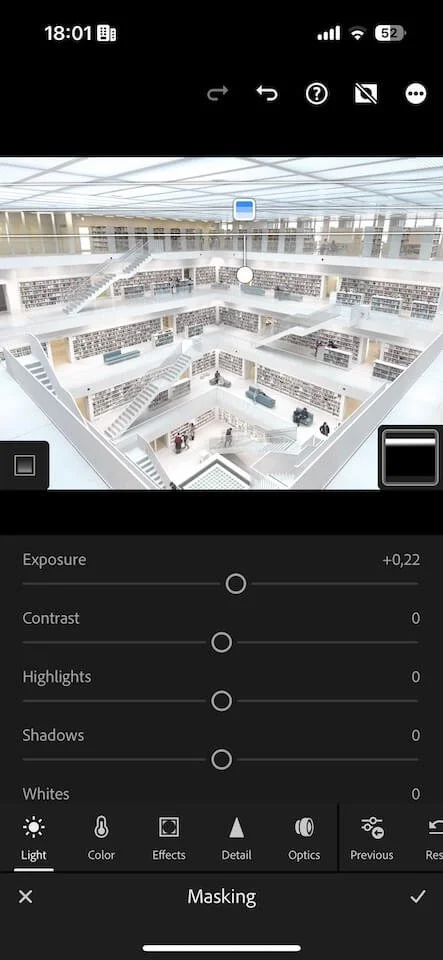
Fix dedicated areas using masks
Final High-Key image
And here is the final photo simulating High-Key Lighting in its full glory - with some perspective correction applied.
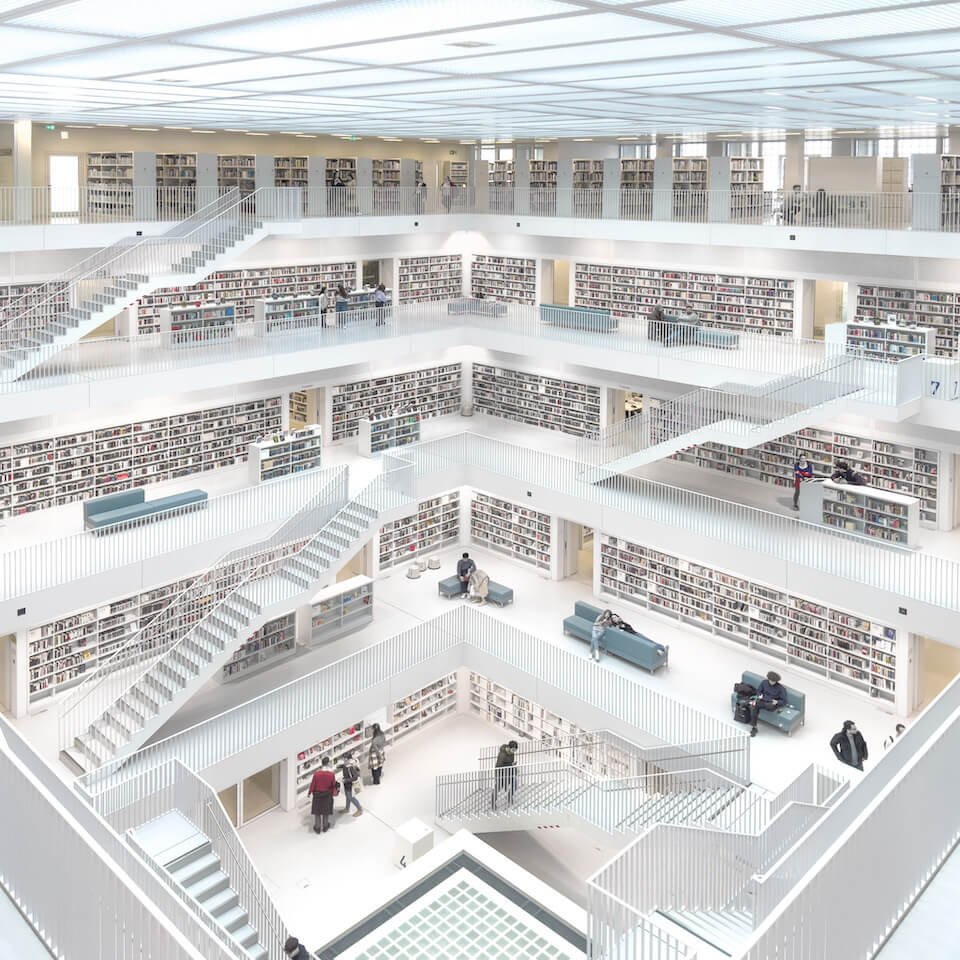
Final high-key edit of the Library in Stuttgart
Please let me know if you found this tutorial helpful in the comments.
Adobe Lightroom ist just one of my favorite photo editing apps on iPhone. To read about the other apps I rely on, please head to the blog post about the recommended iPhone photo editing software I use.
Download High-Key preset for Lightroom
I've published this edit to Adobe Ligthroom Discover. A place, where artists can share their edits and you can download the edits as presets. Please go to Lightroom Discover to download this High-Key edit as a preset for free.
Care about some quick feedback about this article?

It's helpful

I still have a question

Not what I was looking for