ProCamera App - It's called "Pro" for a reason. A review
ProCamera App is an iPhone camera app that offers unparalleled control of the iPhone camera hardware. I have been using this camera app since 2014 and regularly update this ProCamera App Review. In this ProCamera review, you'll read why ProCamera App is my preferred iOS camera app and about the latest features that Cocologics, the developers of ProCamera, added.
Table of Contents
- Overview of photography-related features
- Selected features in more detail
- ProCamera User Interface
- ProCamera Settings
- ProCamera Up! Subscription and what's included
- Roundup and Recommendation
But first (and as always), here are a few sample photos I took with ProCamera App since 2014:
Overview of photography related features of ProCamera App
Over the years, the complete feature list of the ProCamera App has grown quite huge. So in this ProCamera review, I'll focus on the photography features I use most. I can't write much about the video features - simply because I don't use them.
So here are the top features of ProCamera App. These features are the main reasons I've been using this iPhone Camera app for years:
- Supports manual switching between all lenses, no matter which iPhone you own.
- Manually control almost every aspect of the iPhone camera that Apple allows: File Format, shutter speed, ISO speed, white balance, HDR, exposure compensation from -7 EV to +7 EV, manual focus, and to switch between 48 and 12 megapixels resolution of the main lens for iPhone 14 Pro users.
- Supports manual mode for focus, ISO, and shutter speed and offers a priority mode for shutter speed and ISO speed.
- Adjust and lock focus and exposure independently of each other.
- Supports volume button shutter release. That's required if you want to use a Bluetooth remote shutter release.
- If you own an Apple Watch, you can use the ProCamera Apple Watch App as a remote shutter release.
- Support for truly unprocessed RAW ("classic RAW") plus the new Apple ProRAW if you own an iPhone 12 Pro or newer.
- 3 different grids for image composition.
- Anti-shake shutter release for sharp photos in challenging light
- Exposure Bracketing in RAW format. This will save three differently exposed RAW photos you can use to create, e.g., an HDR photo using Lightroom (on your desktop computer!)
- Tilt-Meter for perfectly leveled photos
- Dedicated low light modes that work with all lenses and allow you to save your photo in Apple ProRAW format.
- Different HDR modes, including a manual HDR mode, with asymmetric exposure bracketing
- Automatic perspective correction that you can use with Apple ProRAW.
But that's not all. ProCamera has lots of additional features which I simply can't mention there because I don't use them like:
- Filming
- RAW editor that supports Apple ProRAW
- A private lightbox
- Full-screen trigger
Let's have a look at some of the above features in more detail:
Selected ProCamera App Features in more Detail
Save 48 megapixel photos in JPEG or HEIF format (iPhone 14 Pro or later)
With iPhone 14 Pro, Apple increased the main camera's resolution from 12 to 48 megapixels. But to take and save a 48-megapixel photos in the stock camera app, you'd have to take it using the Apple ProRAW format. Such images can be pretty huge, like 90 megabytes or more.
With ProCamera's recent update, you can take and save 48-megapixel photos also in JPEG or HEIF format if you own an iPhone 14 Pro. Such a 48-megapixel photo in JPEG or HEIF format typically consumes much less storage - around 4-5 megabytes per photo.
If you have an iPhone 14 Pro or later, you'll see a button labeled 48 if you've selected the main camera's lens.
If it's blue, ProCamera will save the photo as a 48-megapixel JPEG or HEIF photo depending on your settings. If it's white, ProCamera will use the 12-megapixel resolution.
Just tap the 48M button to toggle the resolution.
Hidden Feature: If you tap the lens selector of the main camera lens once, you'll get a 2x digital zoom that supports the 48-megapixels resolution.
ProCamera's 2x digital zoom supports 48 megapixels
As you can see from the screenshot, the 48-megapixel button is still enabled for the 2x digital zoom.
Manual Modes and Priority Modes in ProCamera
ProCamera comes with different shooting modes. With the fully automatic mode left aside, you can use full manual mode or one of the priority modes. Using a priority mode, you manually select either ISO or shutter speed, and ProCamera App will determine the other. That's great for shooting in challenging light. In such a scenario, I typically use this feature to set ISO speed to a low value, around 80 or lower, to avoid noise and let ProCamera App determine the shutter speed.
The different priority modes in ProCamera are:
- Shutter priority, where you set the shutter speed manually, and ProCamera determines the best ISO setting.
- IOS priority, where you set the ISO mode manually and let ProCamera select the shutter speed. When using this mode, I usually use the anti-shake shutter release to get a sharp shot, even with a little longer exposure time.
And in really dark scenes, I can always switch to ProCamera App's night mode.
Anti-Shake Shutter Release
Combined with ISO priority mode, this is a true killer feature.
If you use the anti-shake shutter release, ProCamera will only trigger the shutter if you hold your camera perfectly steady. You can manually set the anti-shake shutter release's sensitivity under settings -> stabilization.
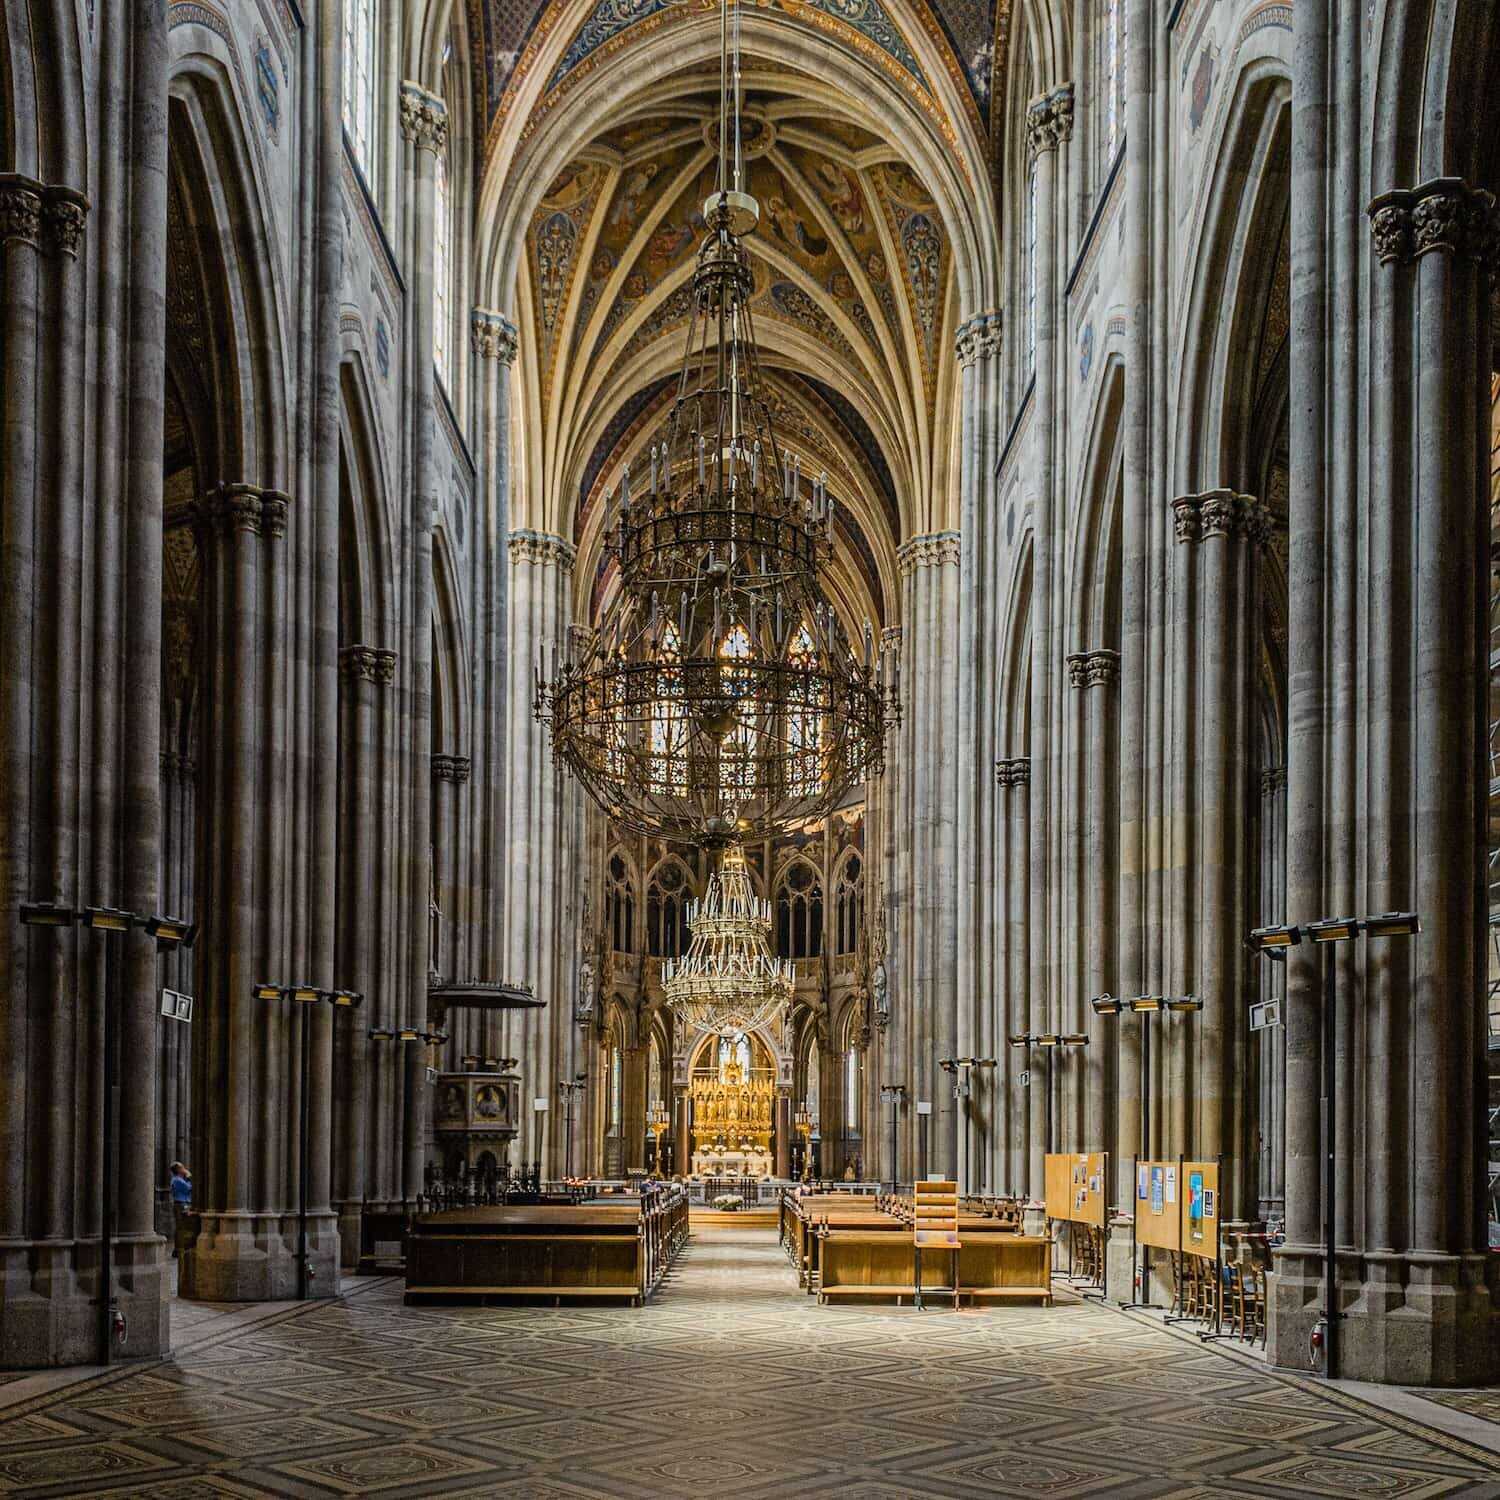
Votiv Church shot using ProCamera App using anti-shake shutter release
I took the above photo in manual mode with ISO set to 25 and the shutter speed set to 1/15th. With anti-shake shutter release, ProCamera waited until I held the camera steady stable and only then took the photo.
So this feature will help you get tack-sharp photos even with longer exposure times if you don't have a tripod.
The anti-shake shutter release is the secondary shutter release to the right of the main shutter release button:
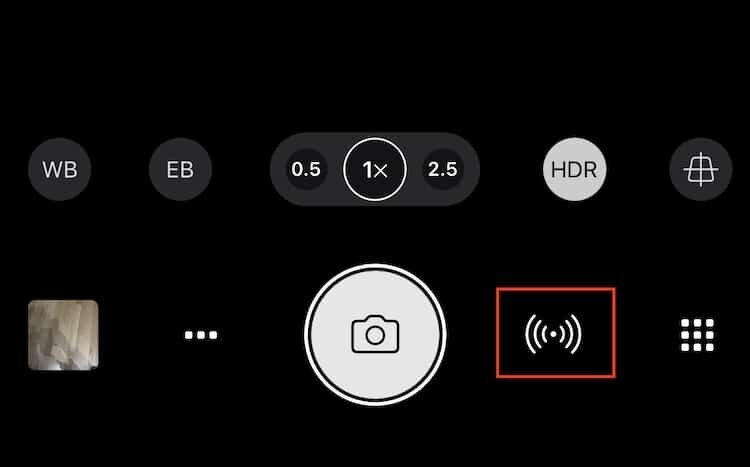
Anti-shake shutter release in ProCamera App
If you don't see it, you have to enable it:
- Tap the menu icon in the lower right corner
- Instead of the self-timer, choose the anti-shake shutter release by tapping it
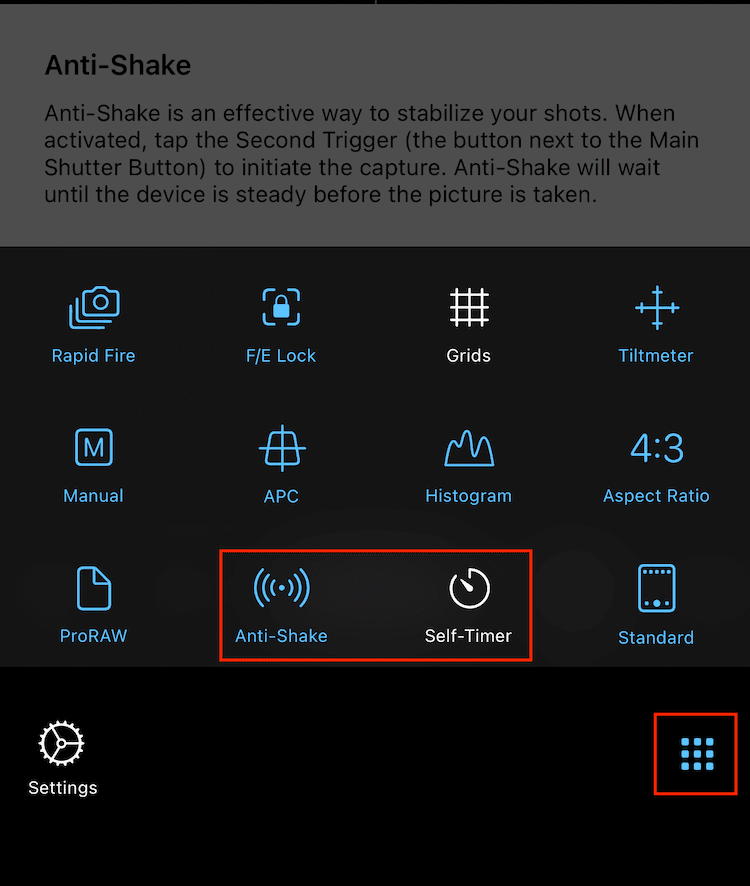
Secondary shutter release setting in ProCamera App
ProCamera Low Light Modes
Long before Apple release night mode, Cocologics, the company behind ProCamera, added low light modes to ProCamera. I've published a separate review of ProCamera Night Mode in the blog.
When using Pro Camera App's low light modes, the app basically takes several photos with different exposure settings. It combines them into a single, well exposed, and low noise photo.
Great if you want to take photos in a really dark environment like this one I took of nightly London from the Shard.

London at night as seen from the Shard. Shot on ProCamera App using Night Mode
Shooting RAW with ProCamera App
In the past, the developers of the ProCamera App were quite fast. Whenever Apple released a new feature, they integrated it into ProCamera App. And so they added the ability to save your photos in the unprocessed RAW format years ago.
Since the release of the iPhone 12 Pro, ProCamera App also supports Apple ProRAW for shooting and in their RAW editor. So by using ProCamera App, you get a camera app for shooting and editing photos in RAW and Apple ProRAW format.
With iPhone 14 Pro, the classic RAW and Apple ProRAW formats are available for all three lenses. The 48-megapixel ProRAW format is only available for the main camera lens.
Classic RAW files from ProCamera App are always saved in a 12-megapixel resolution. You can toggle the resolution of a ProRAW file for the primary lens between 48 megapixels and 12 megapixels if you have an iPhone 14 Pro.
To select the file format and if you want to shoot in classic RAW or ProRAW in the settings menu:
- Tap the menu in the lower right corner. A panel will slide up.
- Now tap Format in the lower left corner of the panel. A popup will appear.
- Select the desired file format for saving your photo.
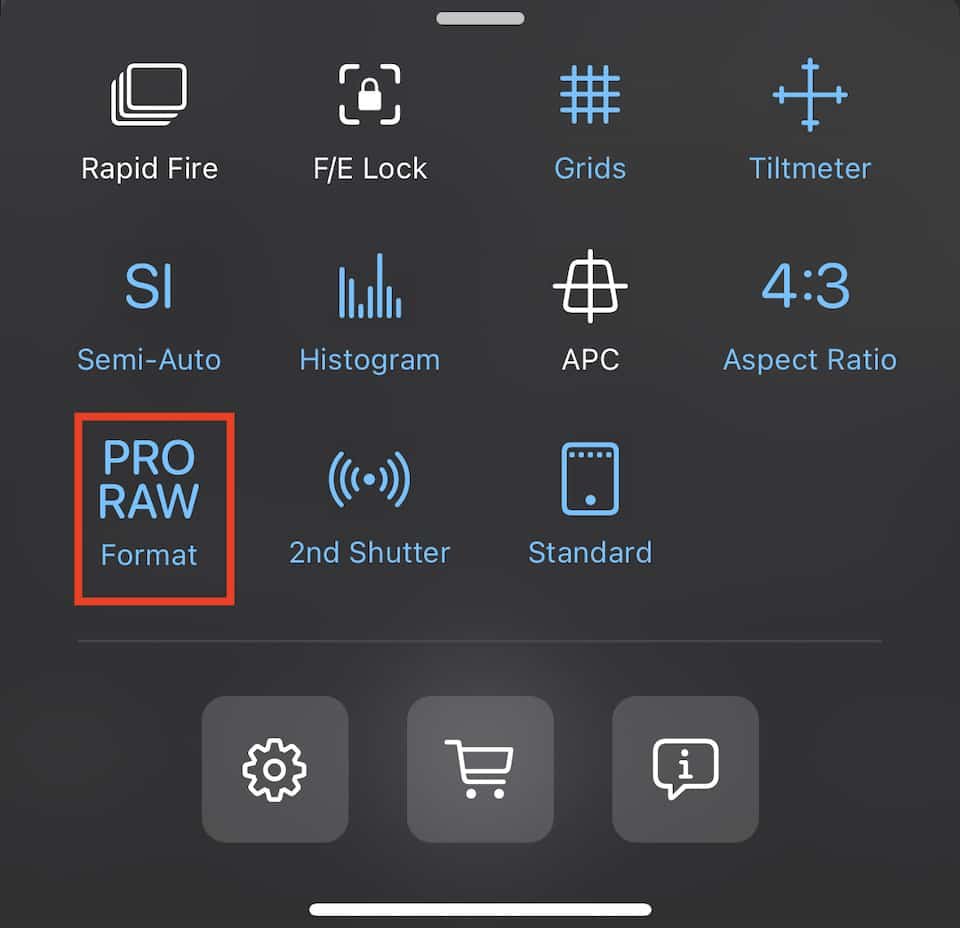
File Format selector in ProCamera App
The ProCamera User Interface
At first impression, the ProCamera user interface may look cluttered. Once you've used it for a while, it seems pretty logical. It seems the developers invested quite a bit of time in optimizing the user interface for photographers.
So, let's start at the bottom area of the screen.

ProCamera User Interface (bottom)
From top left to bottom right you'll find:
- WB to set the white balance
- EB to set exposure bracketing (only with ProCamera Up! Subscription)
- Lens selector
- Enable or disable iPhone HDR (Note, that's different to the built in HDR mode that you'll when subscribing to ProCamera Up!)
- Most recent photo
- Mode selector to select the shooting mode like HDR, low Light, etc.
- Main shutter release button
- Secondary shutter release button set to anti-shake shutter release
- Main Menu.
If you don't use all the shooting modes in ProCamera like I do, you can adjust the order of the shooting modes by:
- Tap the shooting mode selector
- Long tap any of the shooting modes
- Drag it to the desired location in the selector.
Alternatively, swipe left in the shooting mode selector and tap the three buttons on the right. Here you can also reorder the shooting modes or completely hide one or more of them.
At the top of the screen you'll see the current camera settings that you can adjust if you've enabled the proper shooting mode like "M" for manual.

ProCamera User Interface (top)
From the top left to the middle right you'll find:
- An Option to enable or disable the built in flash
- Current shutter speed. If you've enabled manual or SI mode you can tap it and manually set it at the bottom of the screen.
- Adjust exposure compensation
- Current ISO speed. If you've enabled manual or SI mode you can tap it and manually set it at the bottom of the screen.
- An option to switch to the front camera
- The histogram, if enabled under Settings
ProCamera Settings
ProCamera App has dozens of settings in two groups; settings for different shooting modes and the app settings. I'll start with the shooting mode settings.
Tap the menu icon at the right at the bottom of the screen.
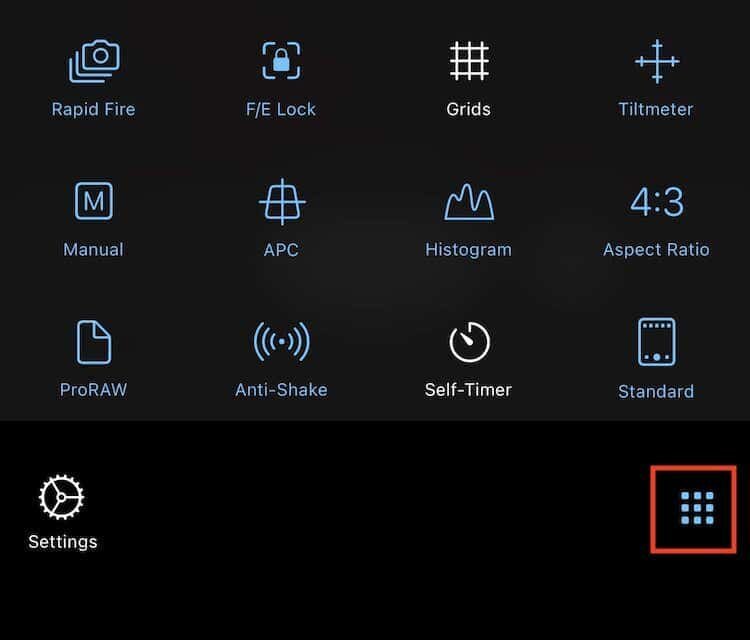
ProCamera Main Menu
Depending on the selected shooting mode, you'll see fewer options than in the screenshot above. Each setting here works as a toggle switch. If a setting is white, it's turned off or set to auto. If it's blue, it's enabled. Repeatedly tap each of the options to choose a different setting. Here's what each option does, from the top left to the bottom right:
- Enable or disable rapid fire. If you've set the shooting mode to HDR, you'll see different HDR options instead
- Enable or disable focus and exposure lock
- Google through the different grids
- Enable or disable the tilt meter that'll help you to get that horizon straight
- Select your shooting mode. Either automatic, manual or semi-automatic
- Enable or disable automatic perspective correction (requires a ProCamera Up! Subscription)
- Enable or disable the histogram. If enabled, it will be shown at the top of the screen
- Toggle through 9 different aspect ratios
- Choose the file format. ProCamera supports RAW, HEIF, TIF and JPEG. Note, that if you own an iPhone 12 Pro, you have to enable Apple ProRAW in the ProCamera App's settings.
- The next two buttons allow you to toggle the secondary shutter release between anti-shake and self-timer.
- Adjust the number of elements displayed on the user interface: Light (few items), medium or standard (everything's displayed)
ProCamera Up! Subscription and what‘s included?
While you can use 90% (or 95%) of the features of ProCamera App with a single purchase, a few features require an affordable subscription. The Subscription is called ProCamera Up! and comes with a 14-day trial.
So, what's included in the ProCamera Up subscription?
- Automatic perspective correction
- RAW exposure bracketing
- The San Fran Filter Pack
- Food Filter Pack
- ProCamera Night Mode Camera (aka Low Light Modes)
- HDR modes (now called vividHDR)
- Private lightbox that protects your photos from prying eyes
And all of that for an affordable price that's less than a menu in a fast-food restaurant: You'll get all of these premium features for $6.99 per year. As I use ProCamera as the main camera for all my iPhone photography, I didn't hesitate to subscribe. Especially given the number of features that have been added in the past years.
You can try the ProCamera Up! premium features for free for 14 days.
Roundup and Recommendation
As the app's name suggests, ProCamera is a truly professional camera app that pushes the iPhone photo hardware to its limits. In the beginning, the number of features may seem overwhelming, but once you've used the app for a while, you'll get the hang of it.
And there's even more in ProCamera App than what I could cover in this review. ProCamera also supports recording videos in SD, HD, HD+, and 4K with a frame-rate of up to 240 frames per second depending on the resolution.
I've tried many different camera apps over the years, but ProCamera app was and still is, in my opinion, the best camera app for iPhone Photographers, and, as always, you can get ProCamera App from the App Store.
Finally, if you plan to use ProCamera in low light mode, don't forget to use a tripod for iPhone! Otherwise, your photos might be a bit blurry.